


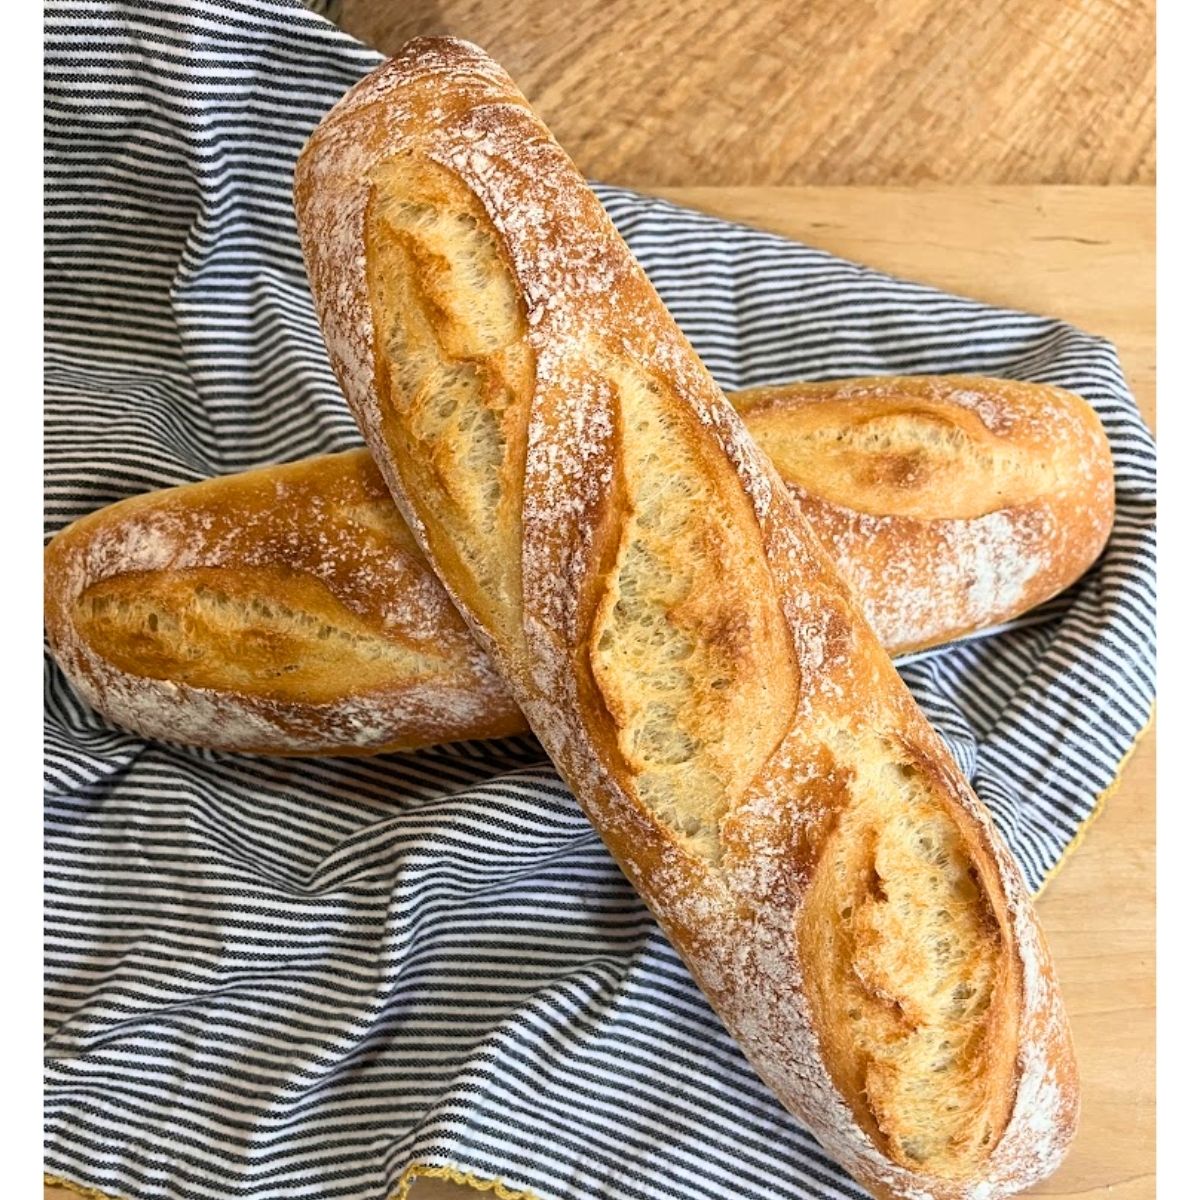
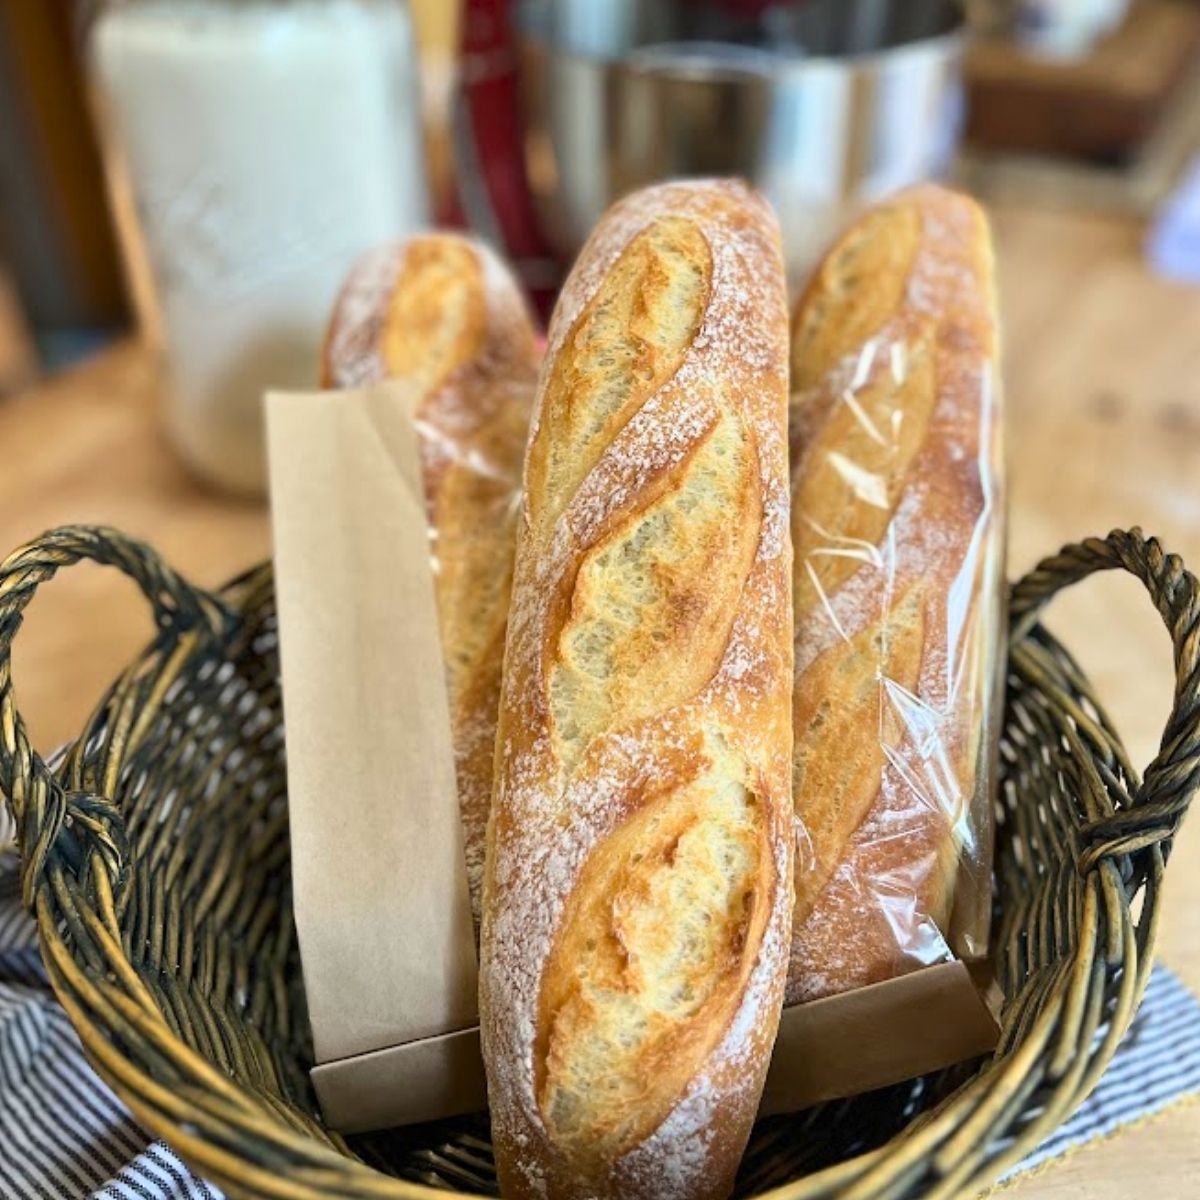
This crusty French baguette recipe is a home baker’s version of a classic French loaf. You don’t need special equipment or complicated starters to make bakery-style bread right at home. With just four simple ingredients and a few hours of patience, you’ll have loaves that rival any bakery baguette.
I’ve written this post as a full tutorial so that even if it’s your first time baking bread, you’ll feel confident from start to finish. Follow each step, to understand how the dough should look, and feel. In under 4 hours, you’ll end up with golden brown baguettes that are crisp, chewy, and full of flavor.
Why You’ll Love This Recipe
This is one of those recipes that makes you fall in love with baking. You start with flour, yeast, salt, and water, and a few hours later you have something extraordinary. This crusty French baguette recipe is approachable and satisfying, and worth baking again and again.
Here’s why readers love it:
- Uses only four simple ingredients.
- Produces a crisp, golden brown crust and light, open crumb.
- Requires no special starter or preferment.
- Bakes beautifully on a baguette pan, baking sheet, or baking stone.
It’s the kind of bread that makes the meal. Serve it with soup, dip it in olive oil, or tear it apart and enjoy it warm with butter.

What Makes a Good Baguette
A good baguette is simple, but perfection lies in the details.
A traditional French baguette should have:
- A thin, flakey crust that stays crisp as it cools.
- A soft, chewy interior with an open crumb.
- A light airy texture.
This crusty French baguette recipe delivers all those qualities. The dough is soft and slightly sticky, which helps create that open crumb. The long rise time develops flavor, and the hot oven with added steam helps the crust bake up crunchy and golden brown.
Tools You’ll Need
You don’t need special bakery tools to make homemade baguettes. Most of what you need is already in your kitchen.
- A stand mixer with a dough hook attachment.
- Razor blade or very sharp knife for scoring the dough.
- A baguette pan, baking sheet, or baking stone.
- A pan of water placed on the lower rack to create steam.
The pan of water is key to achieving that crackly crust. As the water turns to steam, it keeps the crust soft long enough for the dough to expand, then sets it into that perfect crunch.
Step-by-Step Tutorial
Step 1: Activate the Yeast
This is the first step to flavor and structure. In a large bowl, combine ½ cup of warm water (95°F to 100°F), the yeast, and the sugar. Let it sit for about 10 minutes until foamy on top.
If nothing happens after 10 minutes, the yeast may be expired or the water may have been too hot. Start over with fresh yeast.
Tip: Warm water is ideal for activating yeast, but it should never be hot. If you dip your finger into the water, it should feel like a comfortable bath.
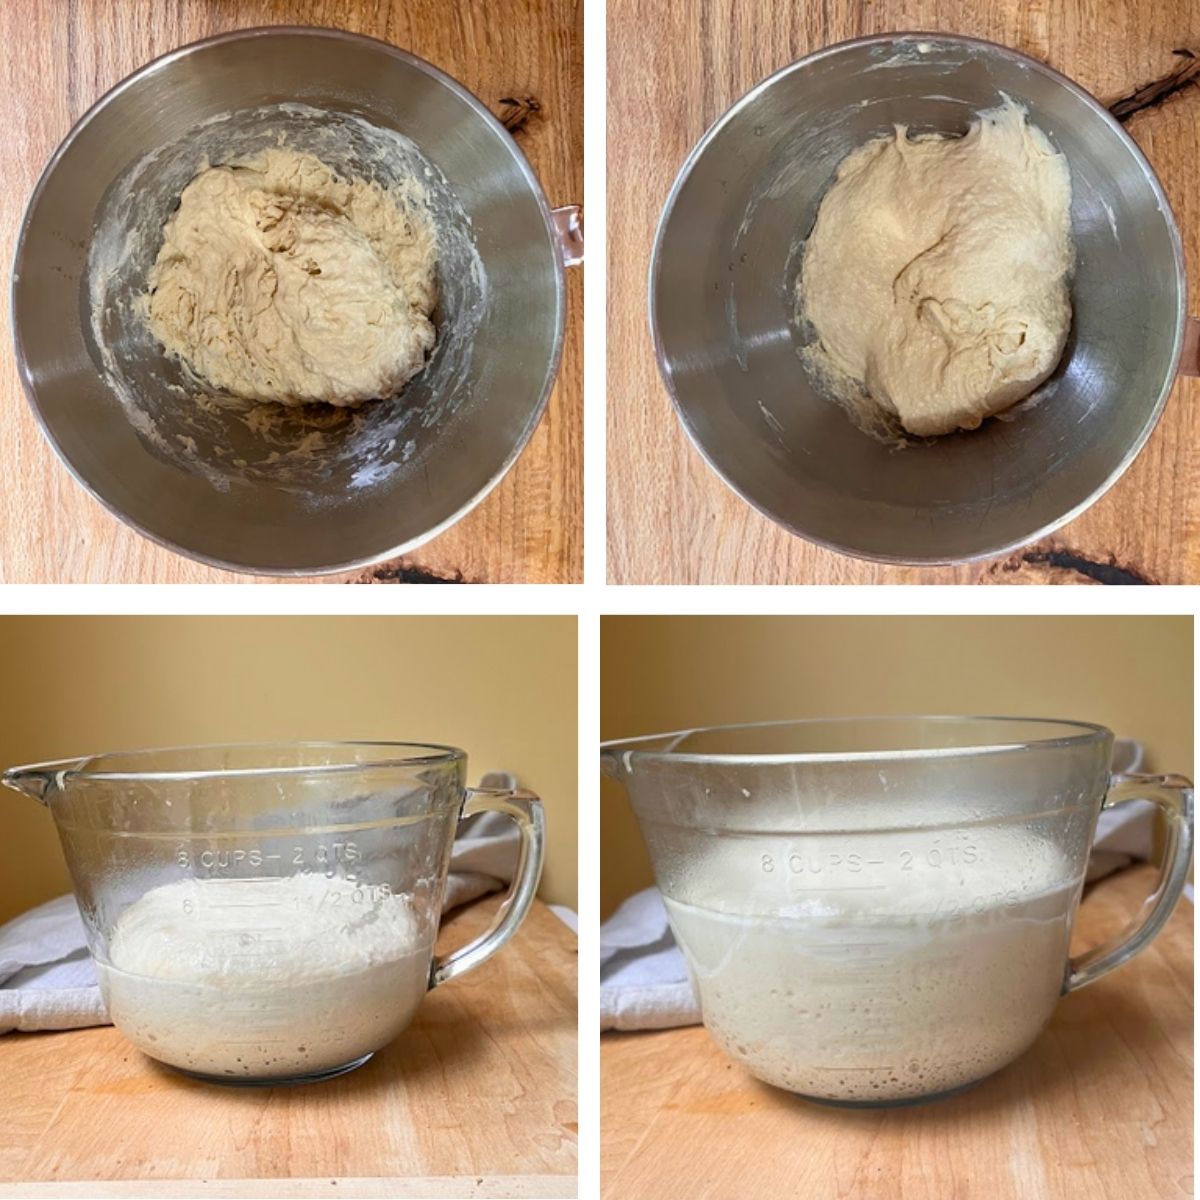
Step 2: Mix the Dough
Into the bowl of a stand mixer, add the flour and salt. Pour in the remaining 1½ cups of warm water and mix on low speed for 3 minutes. The mixture will start out rough and uneven. This is what bakers call a shaggy dough. (A mixture that’s just barely coming together.)
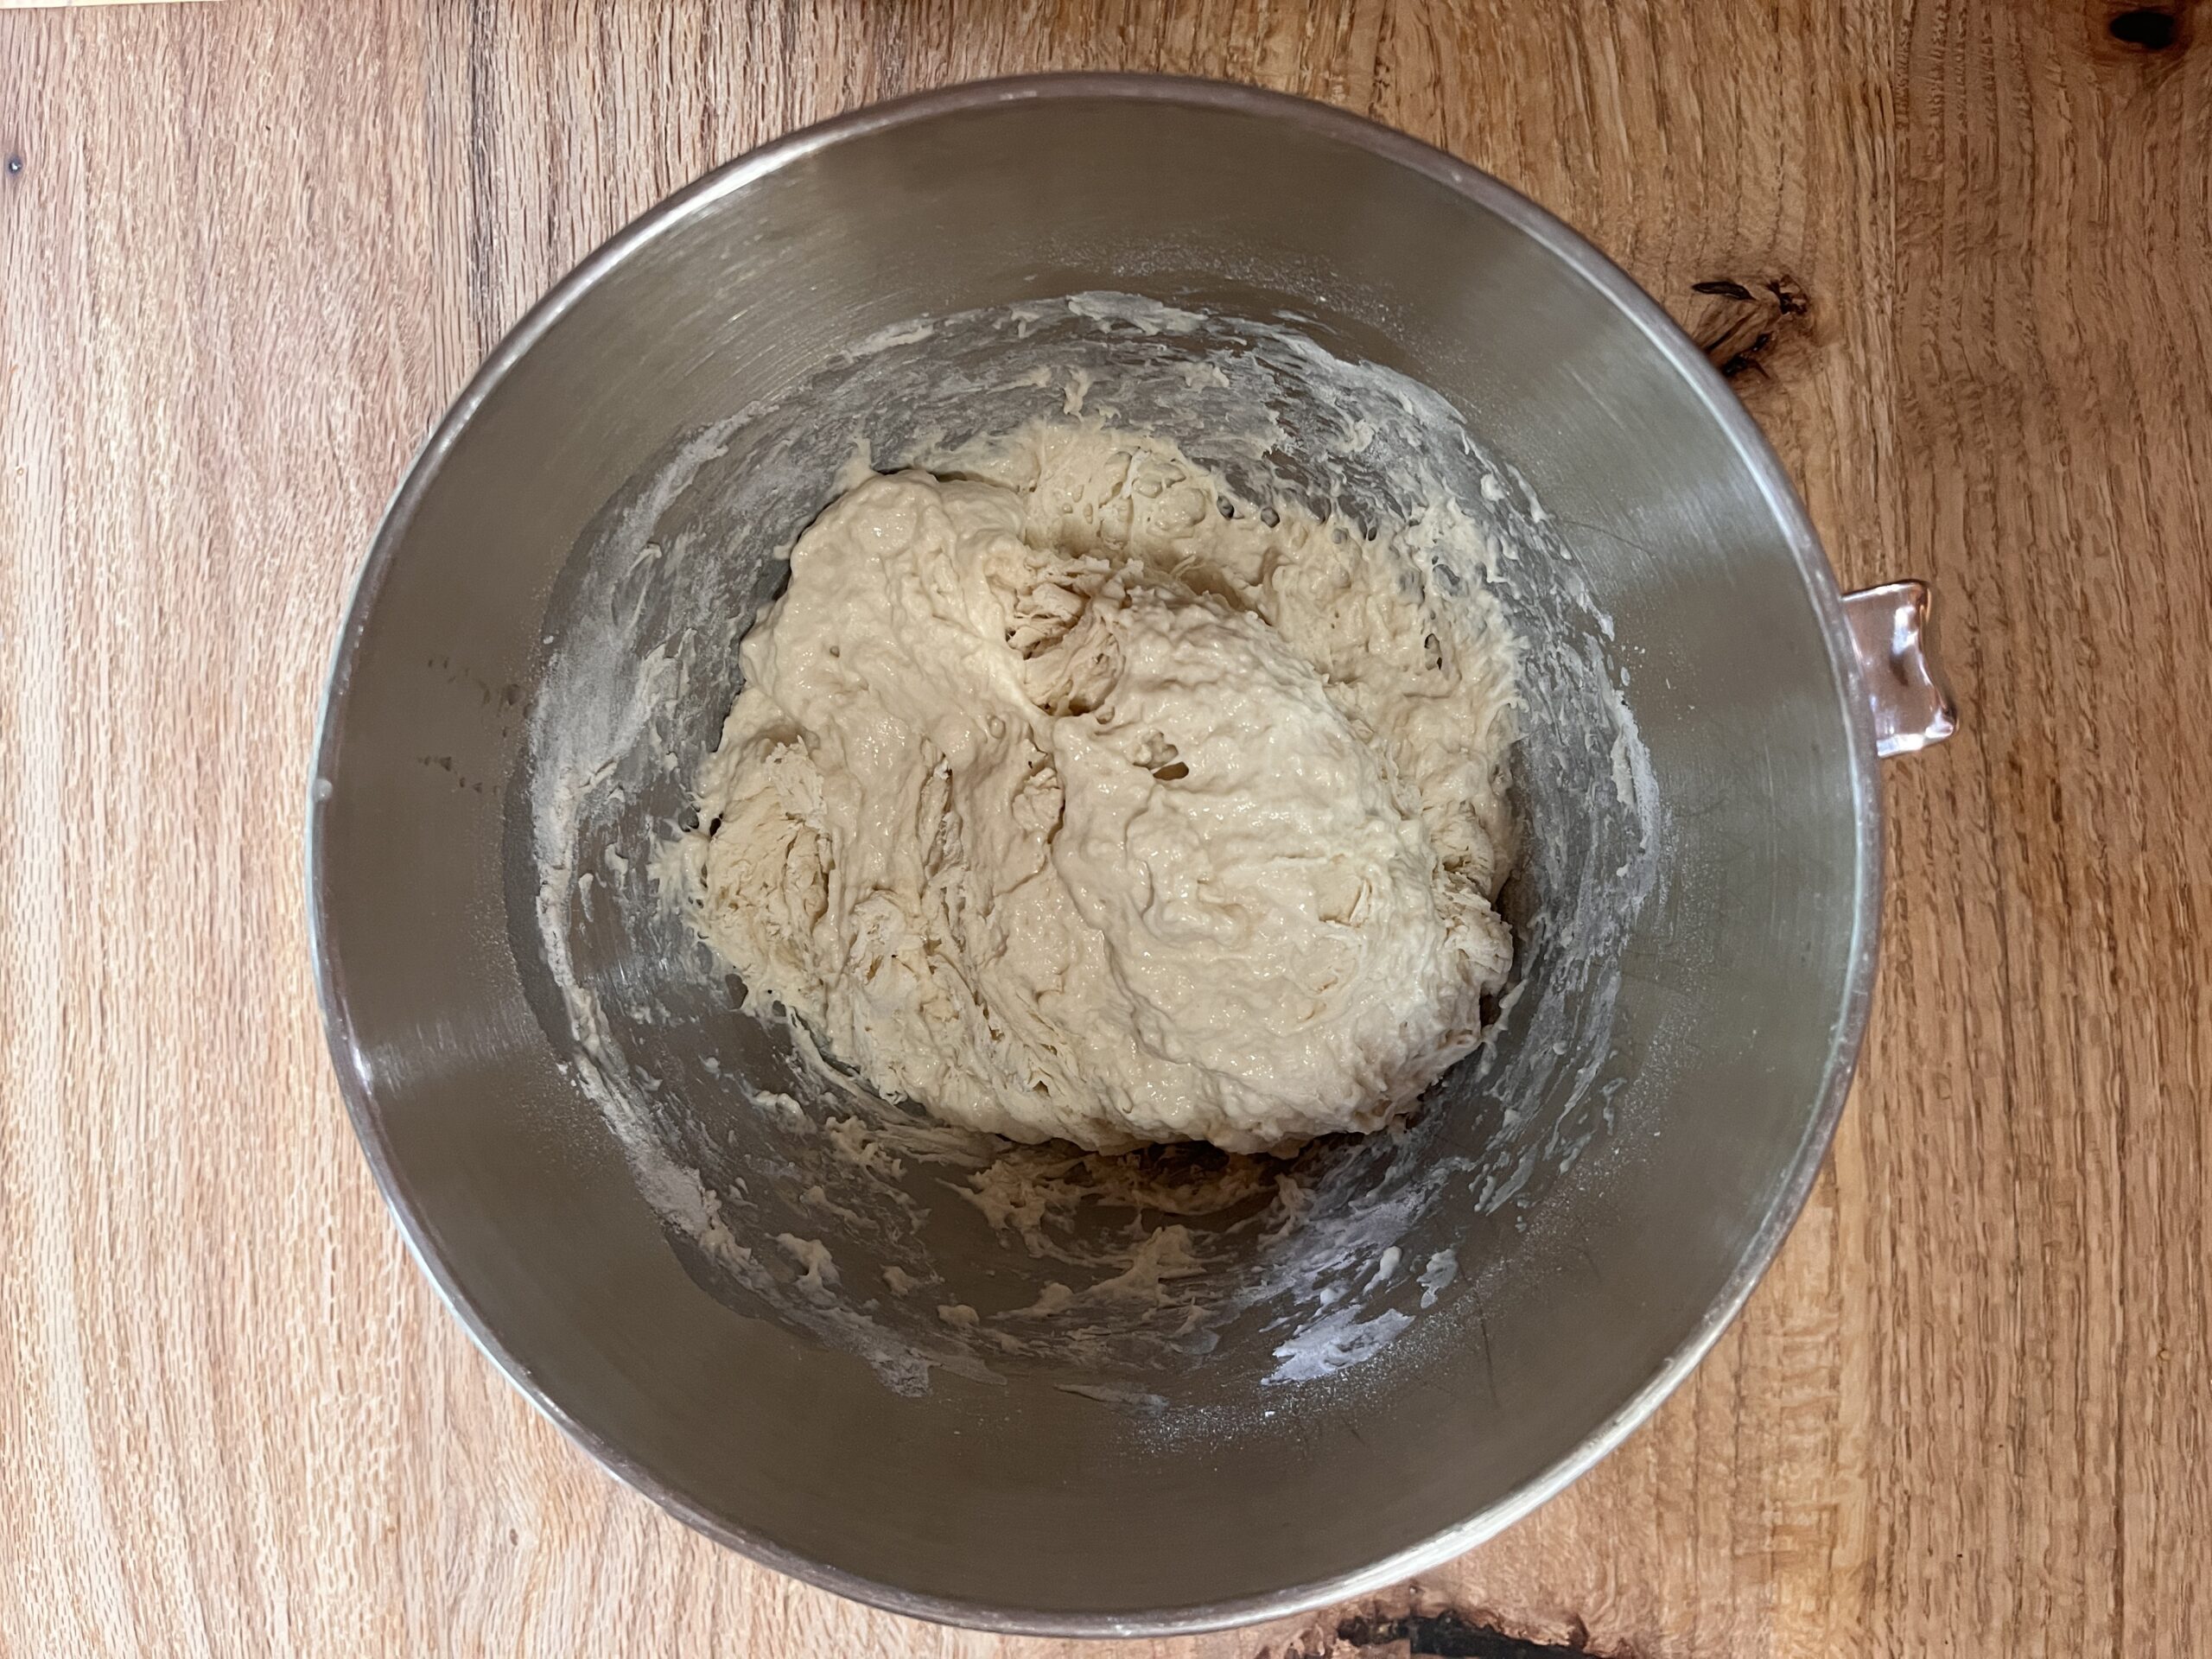
Don’t worry if it seems sticky. Sticky dough means hydration, and hydration means a soft, open crumb later on. Only add a little bit of flour if the dough is too wet to come together.
At this stage, you’re not looking for smoothness. Just make sure all the flour is moistened and combined.
Step 3: Knead Until Smooth
Increase the mixer speed to medium and let it knead the dough for about 5 minutes. You’ll notice the dough beginning to pull away from the sides of the bowl while still clinging slightly to the bottom. It should look very soft, stretchy, and a little sticky. (That’s a good sign.)

Because this is a soft dough, resist the urge to add extra flour. If needed, lightly oil your hands or use a plastic scraper to handle it. The goal is a smooth, supple dough that feels light and slightly tacky, not dense or stiff.
This stage usually takes 3 to 5 minutes. The goal is a smooth, slightly tacky ball of dough.
Step 4: First Rise
Place the dough in a clean oiled bowl, turning once so the surface is lightly coated. This keeps it from drying out as it rises. Cover tightly with plastic wrap and set it in a warm place for about three hours.

During this rise, the yeast feeds on the flour, producing carbon dioxide and alcohol that create the dough’s flavor and structure. When the dough has doubled in size and feels full of air, it’s ready for the next step.
If your kitchen is cool, try setting the covered bowl inside your oven with the light on or near a sunny window.
Step 5: Divide and Pre-Shape
Turn the dough out onto a lightly floured surface. Handle it gently so you don’t lose too much of the air that developed during the rise.
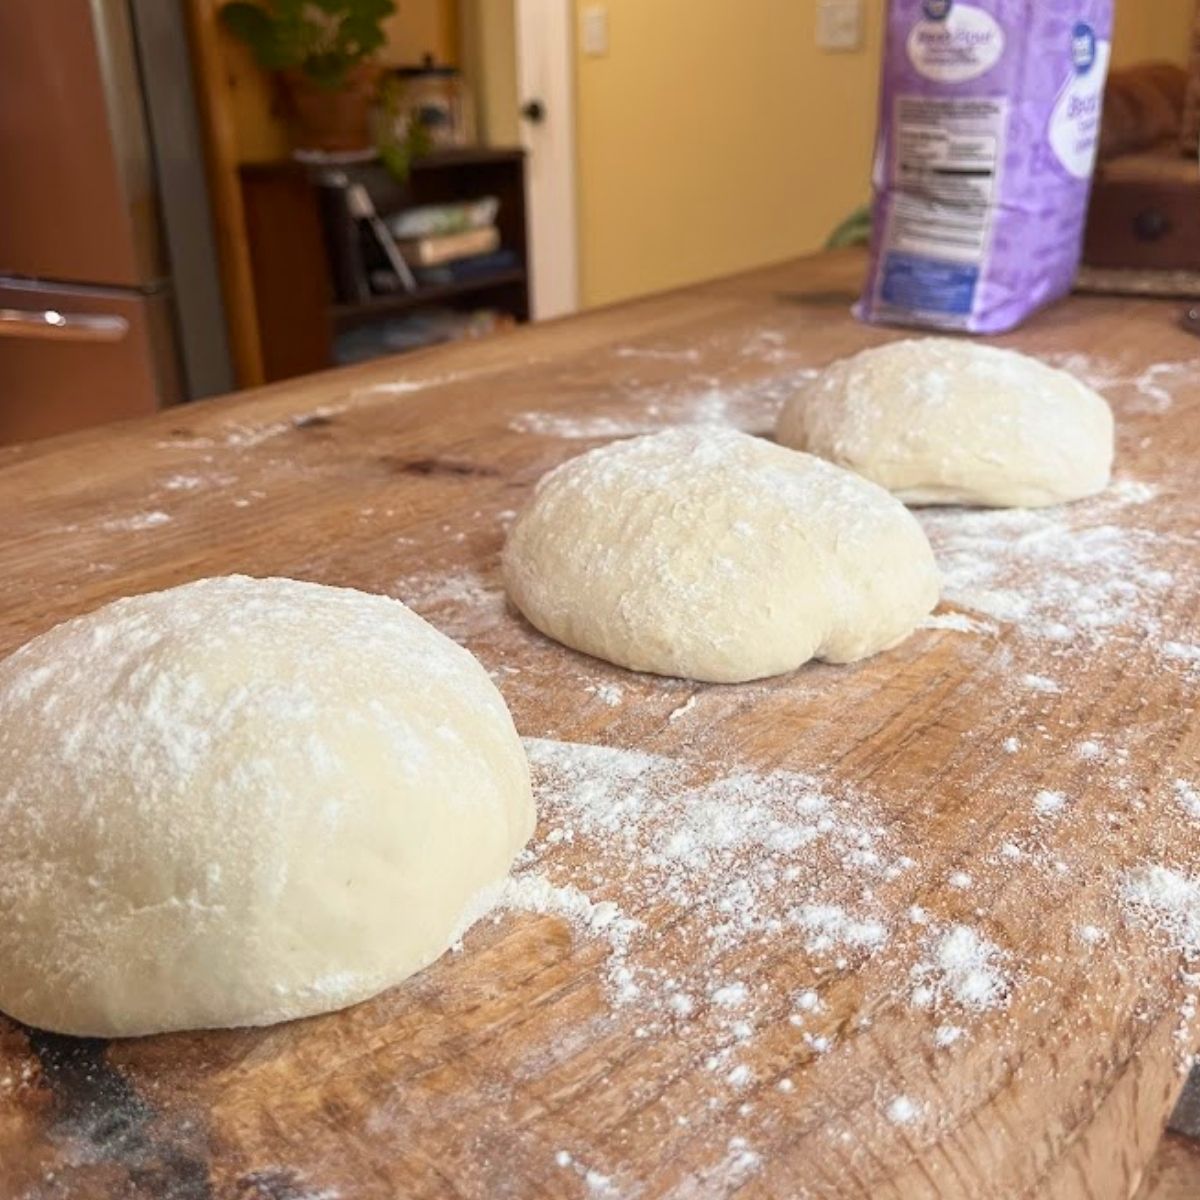
Using a bench scraper or knife, divide the dough into equal portions.
- For 2 full-size baguettes: about 425 grams each
- For 3 smaller baguettes: about 280 to 285 grams each
Shape each portion into a round ball by tucking the edges underneath. Place the dough balls on the counter, cover them with plastic wrap, and let them rest for about 20 minutes.
This resting period relaxes the gluten, making shaping easier.
Step 6: Shape the Baguettes
Shaping baguettes takes practice, but it’s easier once you know the motion.
- Place one dough ball seam-side up and gently flatten it into a rectangle about 8 inches long.
- Fold the top third down toward the center and press the seam firmly.
- Rotate the dough 180 degrees and fold the top third down again, pressing to seal.
- Fold the dough lengthwise like a book and pinch the seam closed from end to end.
- With the seam side down, roll the loaf under your palms from the center out, lengthening it to about 14 to 16 inches. Taper the ends slightly for that classic baguette look.

Transfer the loaves to your baguette pan, baking sheet, or baking stone lined with parchment paper. If using a sheet pan, sprinkle a little cornmeal on the paper first to prevent sticking.
If your dough keeps shrinking back as you roll, give it a short rest and try again. The gluten just needs time to relax.
Step 7: Second Rise
Cover the shaped loaves loosely with plastic wrap or a damp towel and let them rise for 1½ to 2 hours in a warm place. They should look puffy but not doubled in size.
When gently pressed, the dough should spring back slowly and leave a faint impression. If it deflates completely, it has over-proofed; next time, shorten this step slightly.
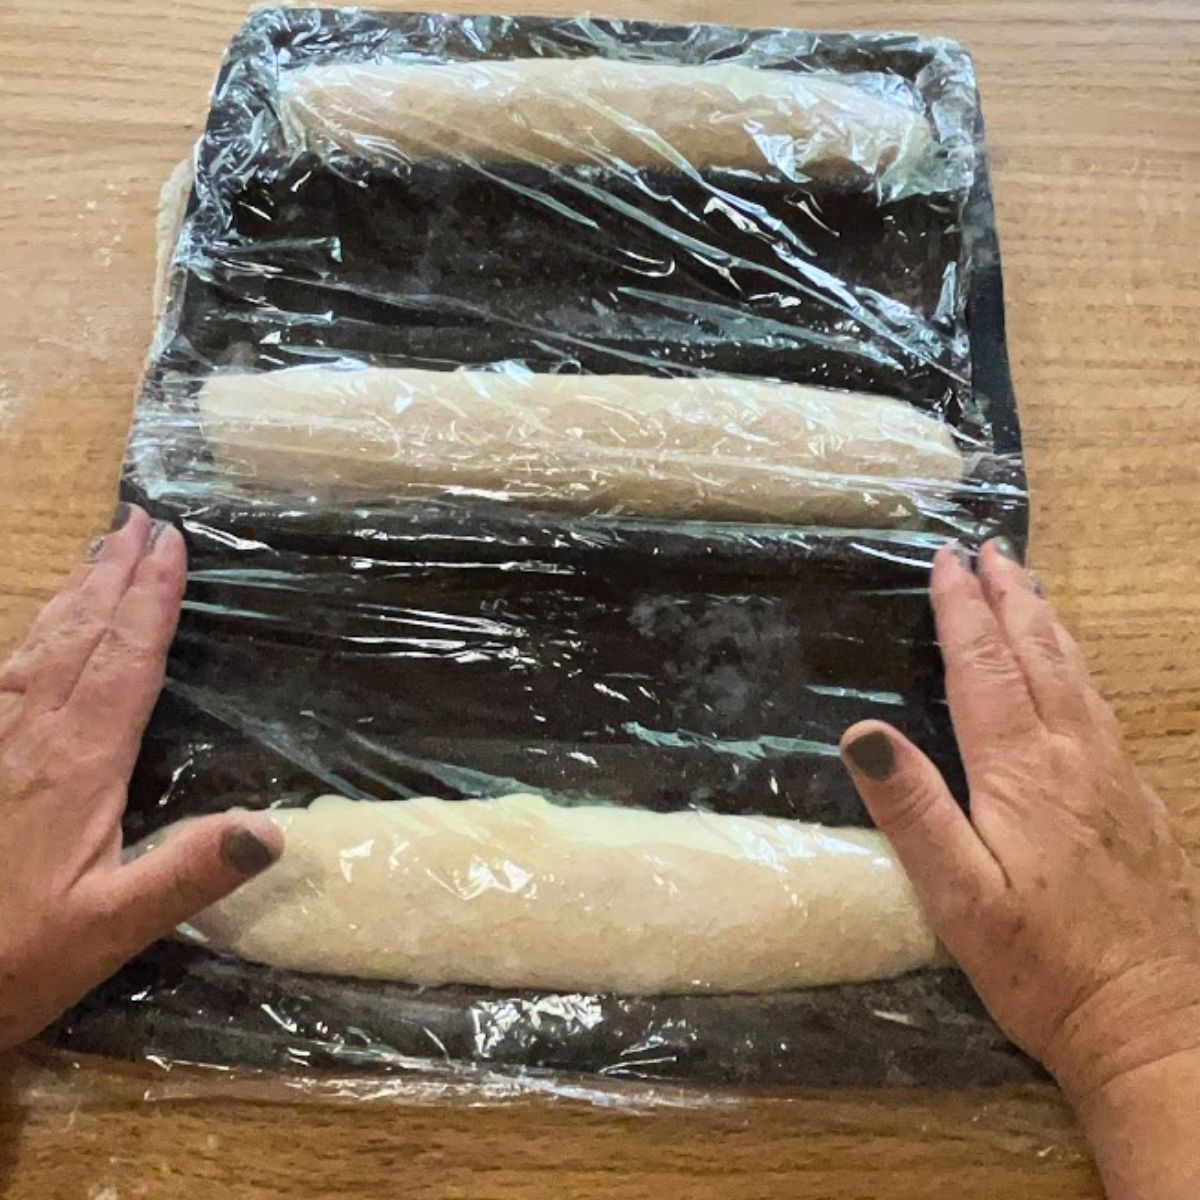
This final rise gives your loaves the volume they’ll need for that beautiful oven spring once they hit the heat.
Step 8: Preheat the Oven and Prepare for Steam
While the baguettes rise, preheat your oven to 425°F. Place a baking stone or inverted sheet pan on the middle rack and a sturdy metal pan on the lower rack.
The stone (or pan) will retain heat and help the bread bake evenly, while the lower pan will hold the water that creates steam.
Once preheated, pour 1 cup of hot water into the lower pan just before baking. This burst of steam keeps the crust flexible, allowing the loaves to expand fully before crisping up.
Step 9: Score the Loaves
Just before baking, lightly dust each loaf with flour. Use a razor blade or sharp knife to make four or five diagonal slashes along each baguette. The cuts should be about ¼ inch deep and overlap slightly.
These slashes allow the bread to expand in a controlled way during baking, producing that classic baguette shape and texture.
Step 10: Bake
Carefully transfer the baguettes to the hot oven. If you’re using a baking stone, slide the parchment paper directly onto it. Quickly close the door to trap the steam.
Bake for 30 to 35 minutes, or until the crust is deep golden brown. The loaves should sound hollow when tapped on the bottom.
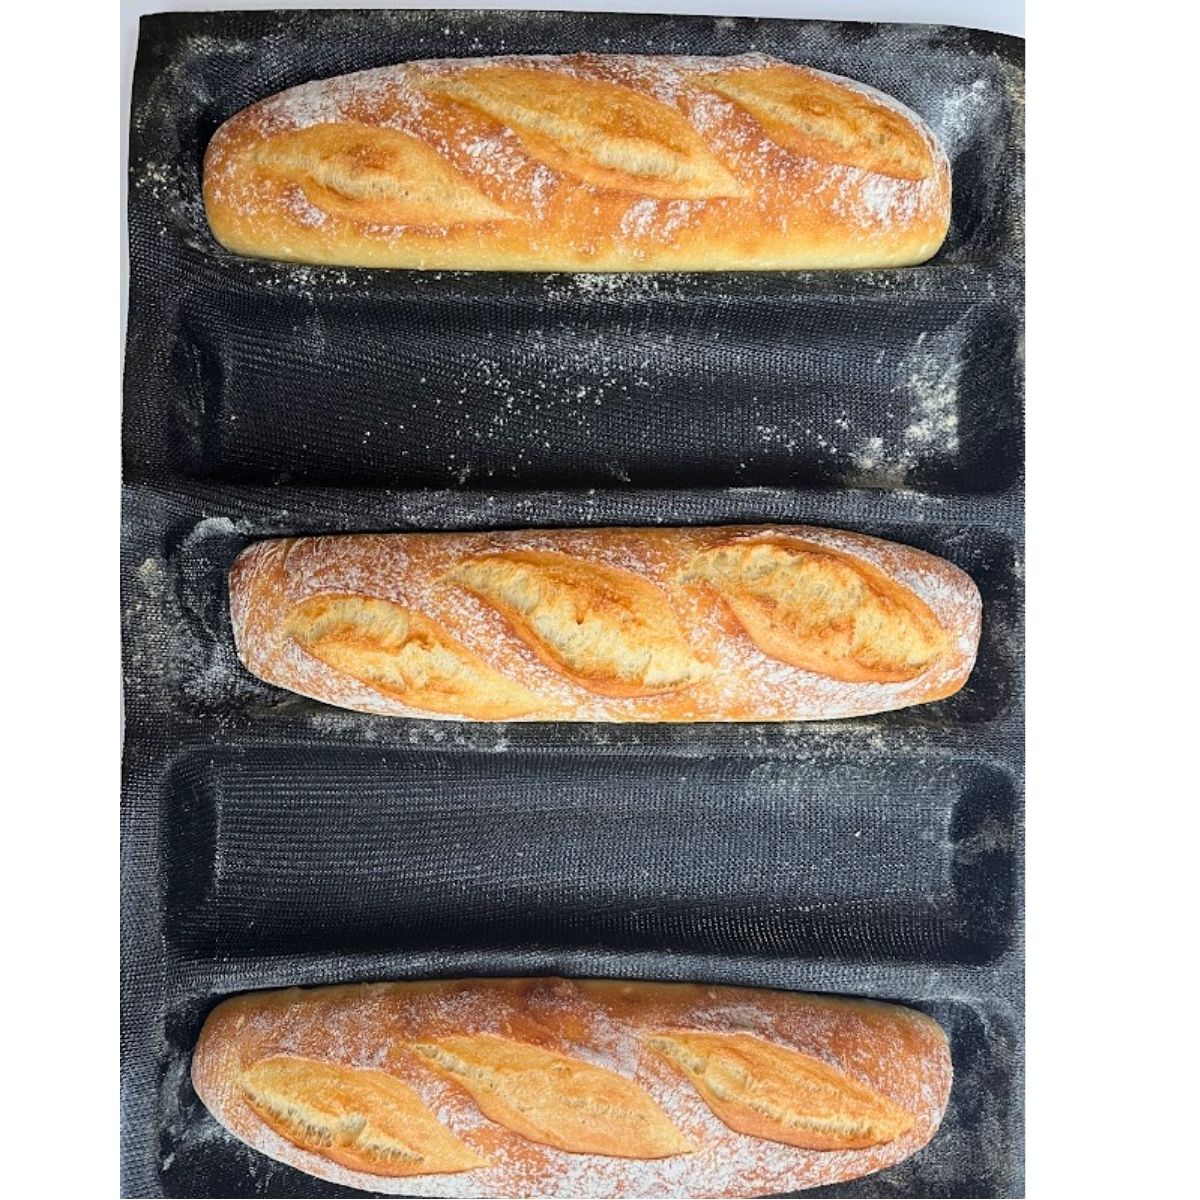
If you prefer a darker crust, bake for a few minutes longer. For extra crispness, open the oven door briefly near the end to release any remaining steam.
A good baguette should feel light for its size and have a firm, crackling crust.
Step 11: Cool and Enjoy
Transfer the baguettes to a wire rack and let them cool for at least 30 minutes before slicing. As they cool, you’ll hear that satisfying crackle — a sure sign of success.
This is the kind of bread that’s perfect for every occasion. Slice it and serve it with soup, dip it into olive oil, or enjoy it plain. Fresh baguettes are best the same day, but you can easily refresh them later.
Recipe Success Tips
- Always use warm, not hot, water for the yeast.
- Weigh your ingredients for the most accurate results — measuring cups can vary.
- Cover the dough with plastic wrap to prevent drying during rises.
- If the dough is sticky, use a touch of oil instead of more flour.
- Steam is essential for that shiny, crunchy crust — don’t skip it.
- Let the loaves cool fully before slicing to preserve the texture.
Storage and Freezing
Baguettes are best the day they’re baked. To store for the next day, wrap loosely in a towel or paper bag and keep at room temperature.
To refresh, bake in a 375°F oven for 5 to 10 minutes until the crust is crisp again.
For longer storage, freeze the loaves in freezer bags. To serve, reheat directly from frozen in a 375°F oven until warm and crunchy.
Crusty French Baguette Recipe
Ingredients
- 2 cups 475 g warm water (95–100°F)
- 1½ teaspoons active dry yeast
- ½ teaspoon sugar
- 4½ cups 640 g bread flour
- 1½ teaspoons salt
- 3 tablespoons cornmeal for dusting
Instructions
- In a large bowl, combine ½ cup warm water, yeast, and sugar. Let sit 10 minutes until foamy.
- Add flour and salt. Pour in the remaining warm water and mix until a shaggy dough forms.
- Knead on a lightly floured surface for 3–5 minutes until smooth and elastic.
- Transfer to an oiled bowl, cover with plastic wrap, and let rise in a warm place for about 3 hours until doubled.
- Turn the dough onto a floured surface, divide into equal portions, and pre-shape into balls. Rest 20 minutes.
- Shape each into a long loaf and place seam-side down on a parchment-lined baking sheet or baguette pan.
- Cover with plastic wrap and let rise 1½–2 hours until puffy.
- Preheat oven to 425°F with a baking stone or inverted sheet pan on the middle rack and a pan on the lower rack.
- Just before baking, pour 1 cup hot water into the lower pan to create steam.
- Slash each loaf 4–5 times with a razor blade and bake 30–35 minutes, until deep golden brown.
- Cool on a rack for 30 minutes before slicing.
- Weighing ingredients is the most accurate way to bake, but cup measurements are included for convenience.
FAQ
Why is my baguette dense?
Dense bread usually comes from adding too much flour or under-proofing the dough. Try using less flour next time and make sure the dough rises fully before shaping.
Can I make the dough ahead?
Yes. After the first rise, cover the dough tightly and refrigerate overnight. Let it come to room temperature before shaping and continuing the recipe the next day.
My dough was too sticky. What did I do wrong?
Sticky dough is normal in baguette recipes. Use slightly damp hands or oil your surface instead of adding more flour.
How do I get that shiny, crunchy crust?
The secret is steam. Always bake with a pan of hot water on the lower rack, and make quick, confident slashes before baking.
Can I bake this on a sheet pan?
Yes. Line the pan with parchment paper and dust with cornmeal. For best results, preheat the pan to help the bottom crisp up.
This crusty French baguette recipe proves that great bread comes from time, care, and confidence — not complicated techniques. With a few hours of patient rising and a hot oven, you’ll pull from your kitchen the kind of bread that feels like a small victory every time.
More Bread Recipes You’ll Love
If you loved this crusty French baguette recipe, try a few more of my favorite homemade bread recipes next. Each one uses simple ingredients and includes step-by-step tips for home bakers.
- My Soft and Fluffy White Bread recipe is the perfect beginner loaf
- For something heartier, try my Whole Wheat Sandwich Bread
- An easy foolproof bread is my Easy Soup Bread recipe
Each of these recipes builds on the same techniques you practiced here, helping you grow your confidence and get consistent results right from your home oven.

List Of Backlinks Sites says
Outstanding post, you have pointed out some fantastic details , I too think this s a very excellent website.
Better Baker says
Thank you very much!
Breanna says
This bread is crusty, chewy perfection. I was anticipating having to try several recipes to find the perfect French bread but no need, this is it
Cloyd Hartmann says
It only works when I'm Singapore.
Malika Raynor says
My neighbor Albertina has one of these. She works as a gardener and she says it looks humongous.