


White chocolate-dipped lemon biscotti are delightfully crisp and bursting with fresh lemon flavor. Each slice is baked twice for that signature crunchy texture, then dipped in creamy white chocolate for the perfect balance of sweet and crunchy.
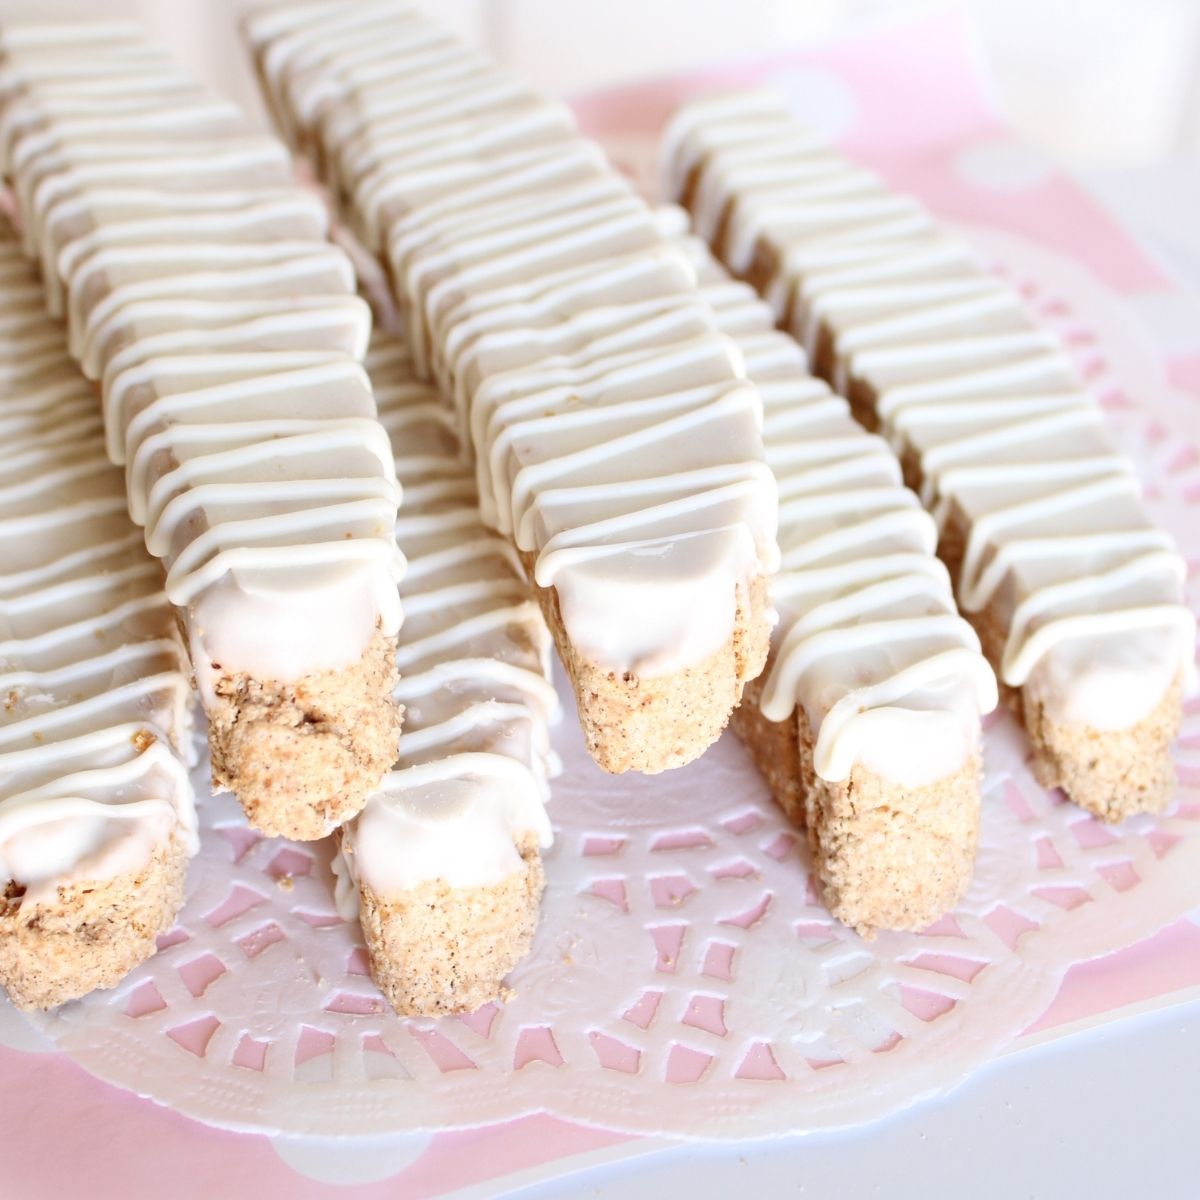
These biscotti feel bakery-fancy but are surprisingly simple to make. Plus, biscotti are freezer friendly, which makes them perfect for making ahead. If you love a cookie that stays crisp and freeze beautifully, this one delivers every time!
Why You’ll Love This Biscotti Recipe
- Crisp and crunchy texture
- Long shelf life
- Perfect cookie for gifting, packaging, or selling
Can You Freeze Biscotti?
If you want to bake these ahead of time, you absolutely can. Biscotti freeze beautifully, whether they are plain or chocolate dipped. You can make them ahead, freeze a full batch, or pull out one or two at a time for your morning coffee. Here is exactly how to do it.
How to Freeze Chocolate-Dipped Biscotti
I like to freeze biscotti after the second bake and before dipping in chocolate.
If you want to freeze them already dipped, I recommend using candy melts instead of real white chocolate.
Here is the best way to freeze biscotti:
- Cool completely after the second bake
- Freeze in a single layer at first
- Store in an airtight container or freezer bag
- Keep in a dry place in the freezer for up to 2 months
You can prevent condensation when thawing by leaving the container closed until the biscotti comes to room temperature.
White Chocolate-Dipped Lemon Biscotti
These chocolate-dipped lemon biscotti are crisp cookies with a bright citrus flavor and a smooth white chocolate finish. They are the perfect cookie for morning coffee, hot tea, or spring gift boxes.
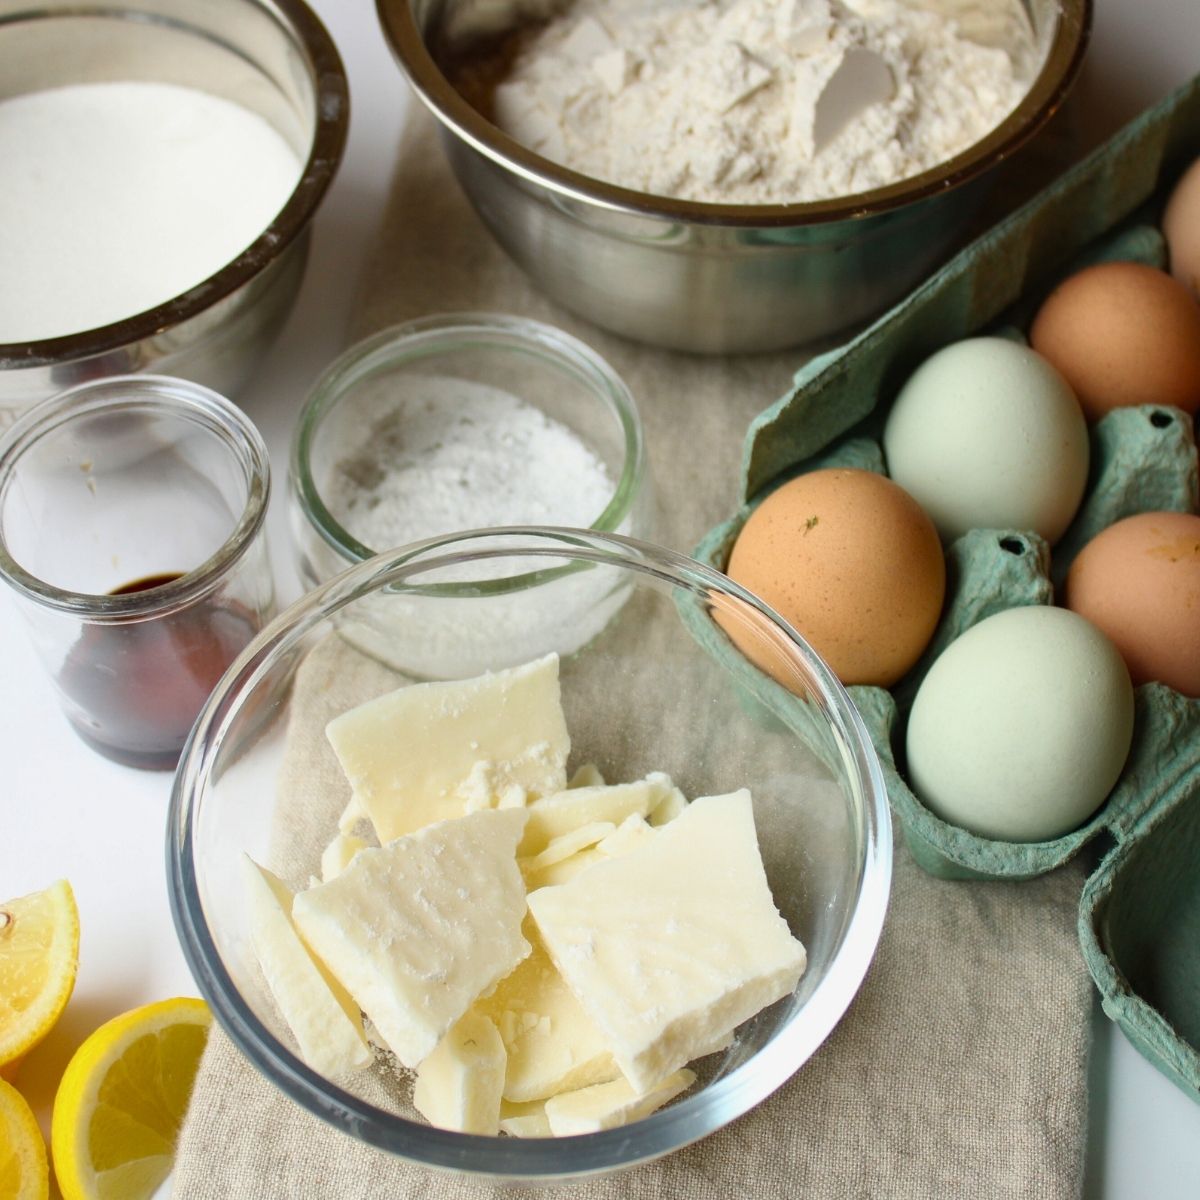
Ingredients
Unbleached all-purpose flour – provides structure and keeps the biscotti sturdy for slicing.
Baking powder – adds a little lift during the first bake.
Salt – balances sweetness
Sugar – helps create golden brown edges.
Eggs – the trick to creating a firm texture.
Vanilla extract –A classic flavoring, but for a different twist, you can use almond extract instead of vanilla.
Fresh lemon zest – brings a bright, fresh citrus flavor.
White chocolate or candy melts – perfect for dipping and finishing the biscotti.
How to Make Lemon Biscotti
First Bake
Biscotti are actually so easy to make!
Start by preheating your oven to 350 degrees F and lining a baking sheet with parchment paper.
In a medium bowl, whisk together the flour, baking powder, and salt. You can sift them if you’d like, but a good whisk does the job. Set that bowl aside.
In a large bowl, whisk the sugar and eggs together until the mixture becomes lighter in color and slightly thickened. This takes about three minutes. You are incorporating air here, which helps the texture. Stir in the vanilla extract, or almond extract if you prefer, and the zest of one whole lemon.

Now sprinkle the dry ingredients over the wet ingredients and gently fold everything together until just combined. Do not overmix. The dough will be thick and slightly sticky. That is exactly what you want.
How to Shape the Biscotti Dough
This recipe makes two logs.
Turn the dough out onto your prepared baking sheet. Divide dough evenly into two portions. With lightly floured hands, shape each portion into a log about 13 inches long and 3 to 4 inches wide.
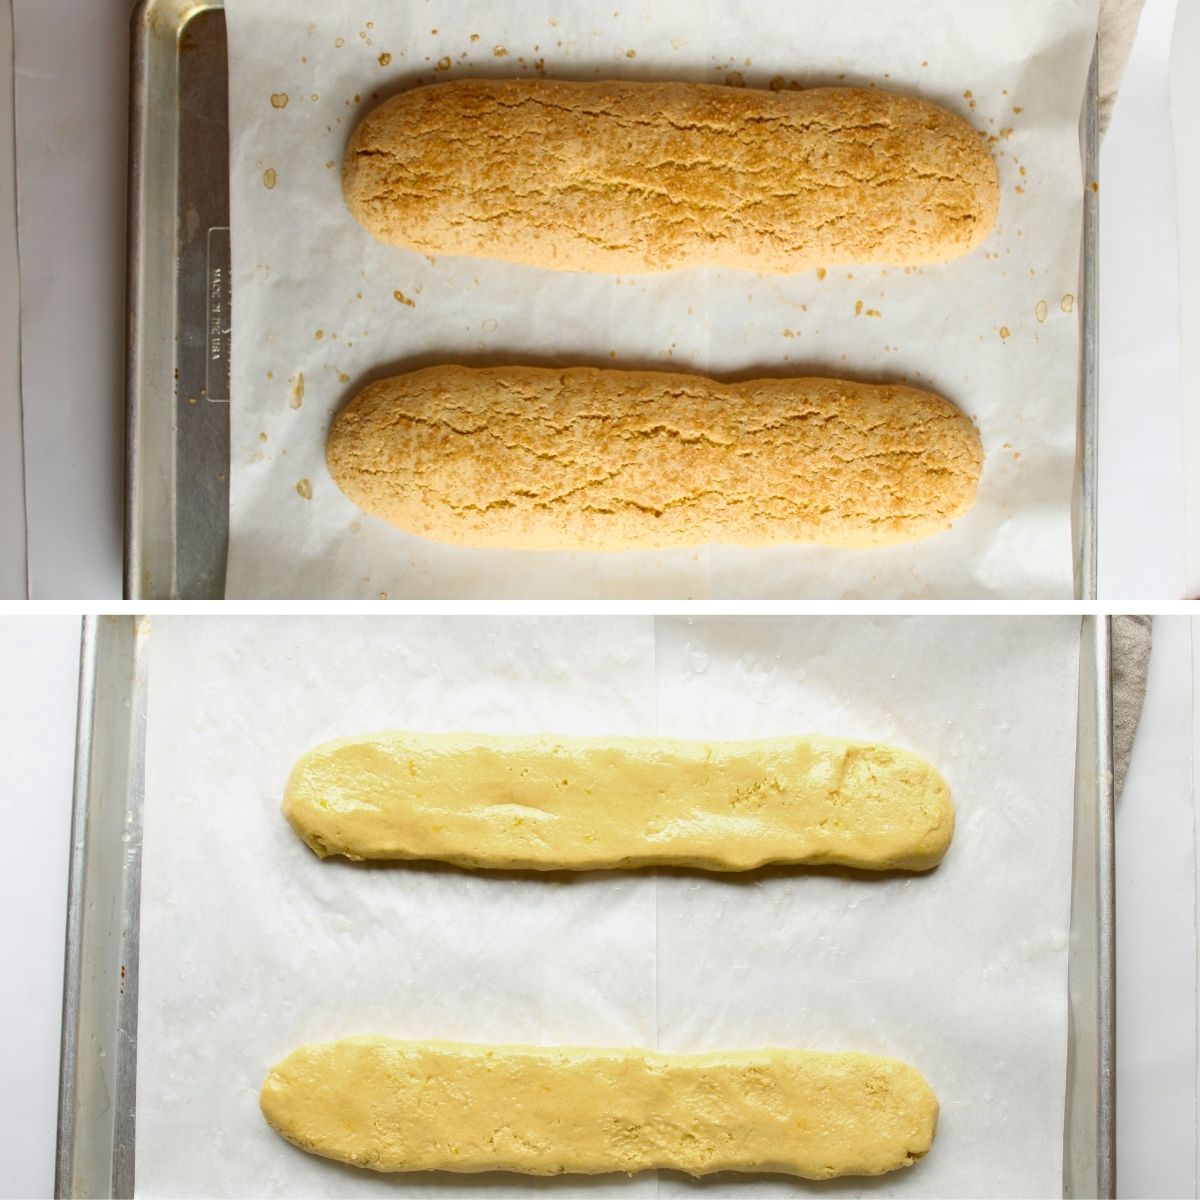
Pat the tops gently to smooth them out. The logs should be slightly flattened, not round like a loaf of bread. They will spread slightly in the oven.
If the dough sticks to your hands, dust them lightly with flour. Just a little bit makes shaping much easier.
Bake for about 35 minutes, until the logs are golden brown and beginning to crack on top. Let them cool for 10 minutes before slicing.
Dipping the Biscotti
Place your white chocolate or candy melts in a microwave-safe bowl.
Heat in 30 second intervals, stirring well after each round. Even if the chocolate does not look fully melted, stir it. White chocolate holds its shape as it melts, so stirring helps you see the true consistency. Continue heating in short bursts until smooth. Do not overheat or it can seize.
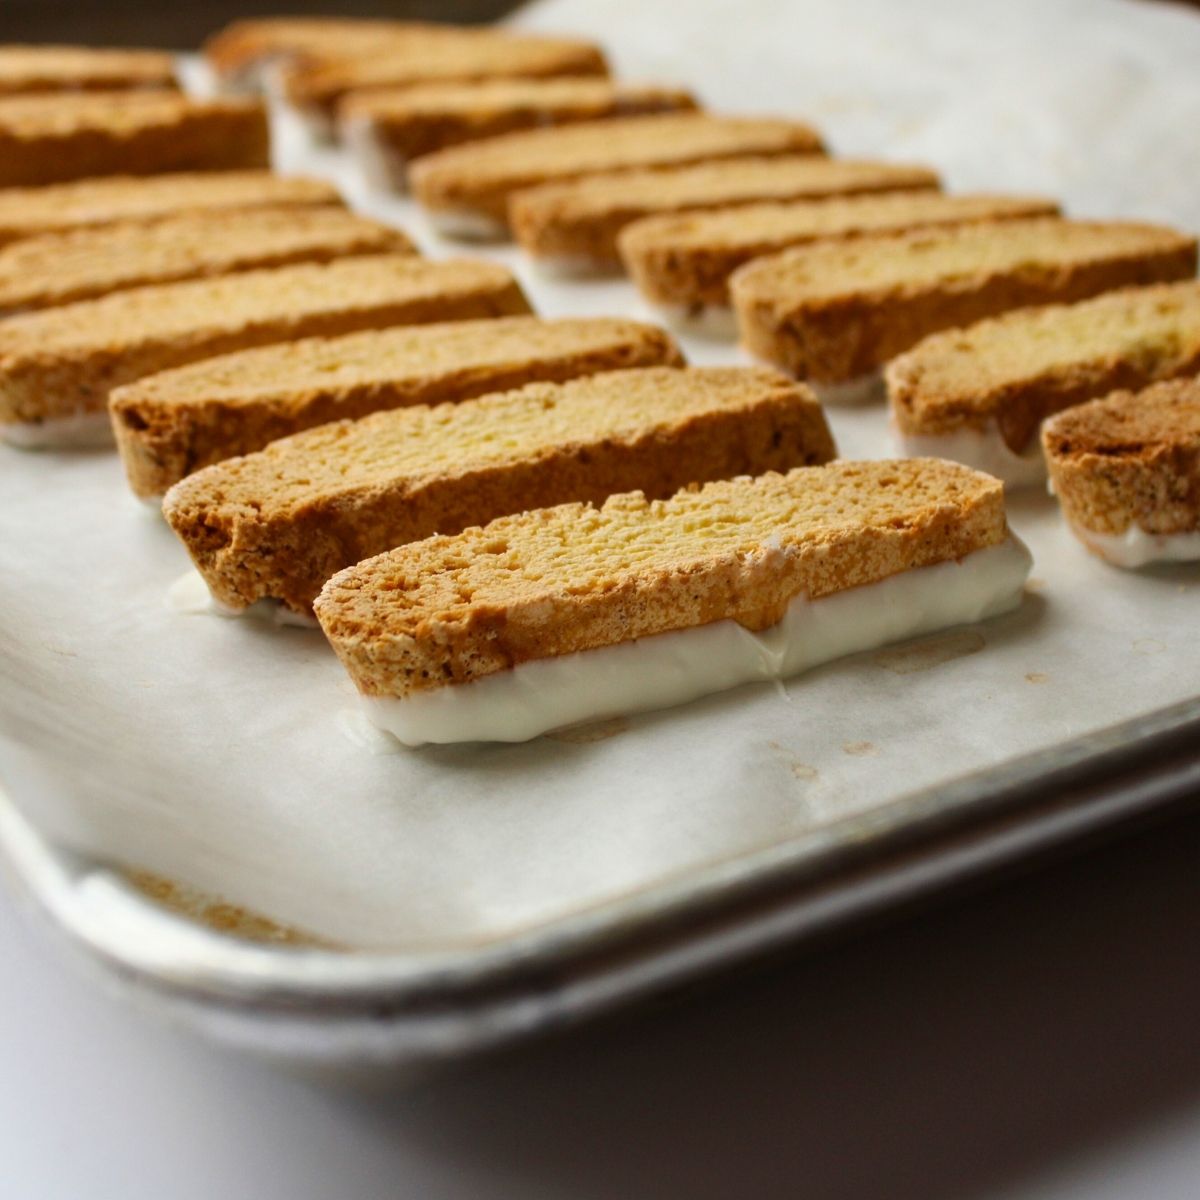
For dipping, I like to transfer the melted chocolate to a small, shallow container. A glass food storage dish or small rectangular Tupperware works perfectly. The key is using something just wide enough to fit the flat side of the biscotti. This makes dipping easier and gives you a clean, even edge. You can see the size I use in the photo.
Dip the flat side of each biscotti straight down into the melted chocolate. Lift and let the excess drip off for a few seconds. Place the chocolate side down on parchment paper and allow it to set.
If you would like a drizzle on top, flip the biscotti over once the base is set and use a spoon to drizzle additional chocolate across the tops.
Allow the chocolate to fully set before packaging or freezing.
If you are unsure which chocolate to use, I have a full guide on the different types of dipping chocolate and when to use each one. I will link that here.

How to Store Biscotti
Store biscotti in an airtight container at room temperature. Keep them in a dry place away from direct sunlight.
The shelf life of biscotti at room temperature is up to 2 weeks. Because they are dry, twice-baked cookies, they hold their crunchy texture much longer than soft or chewy cookies.
If you are wondering, can you freeze biscotti, the answer is yes. For best results, freeze them after the second bake and before dipping in chocolate. Simply cool completely, place in a freezer bag or airtight container, and freeze for up to 2 months.
You can also freeze chocolate-dipped biscotti. If you plan to do that, use an almond bark or candy melt style chocolate, since it freezes and thaws more consistently than real white chocolate. Allow the chocolate to fully set, then double wrap or prepackage them before freezing to protect the texture.
When ready to use, let them come to room temperature in the package before opening to prevent condensation.
Why Biscotti Are a Great Make-Ahead Cookie
Biscotti are already baked twice. That means much of the moisture has been removed.
That is why they:
- Have a long shelf life
- Freeze beautifully
- Travel well
- Maintain a crunchy cookie texture
Allyson’s Bakery Tips
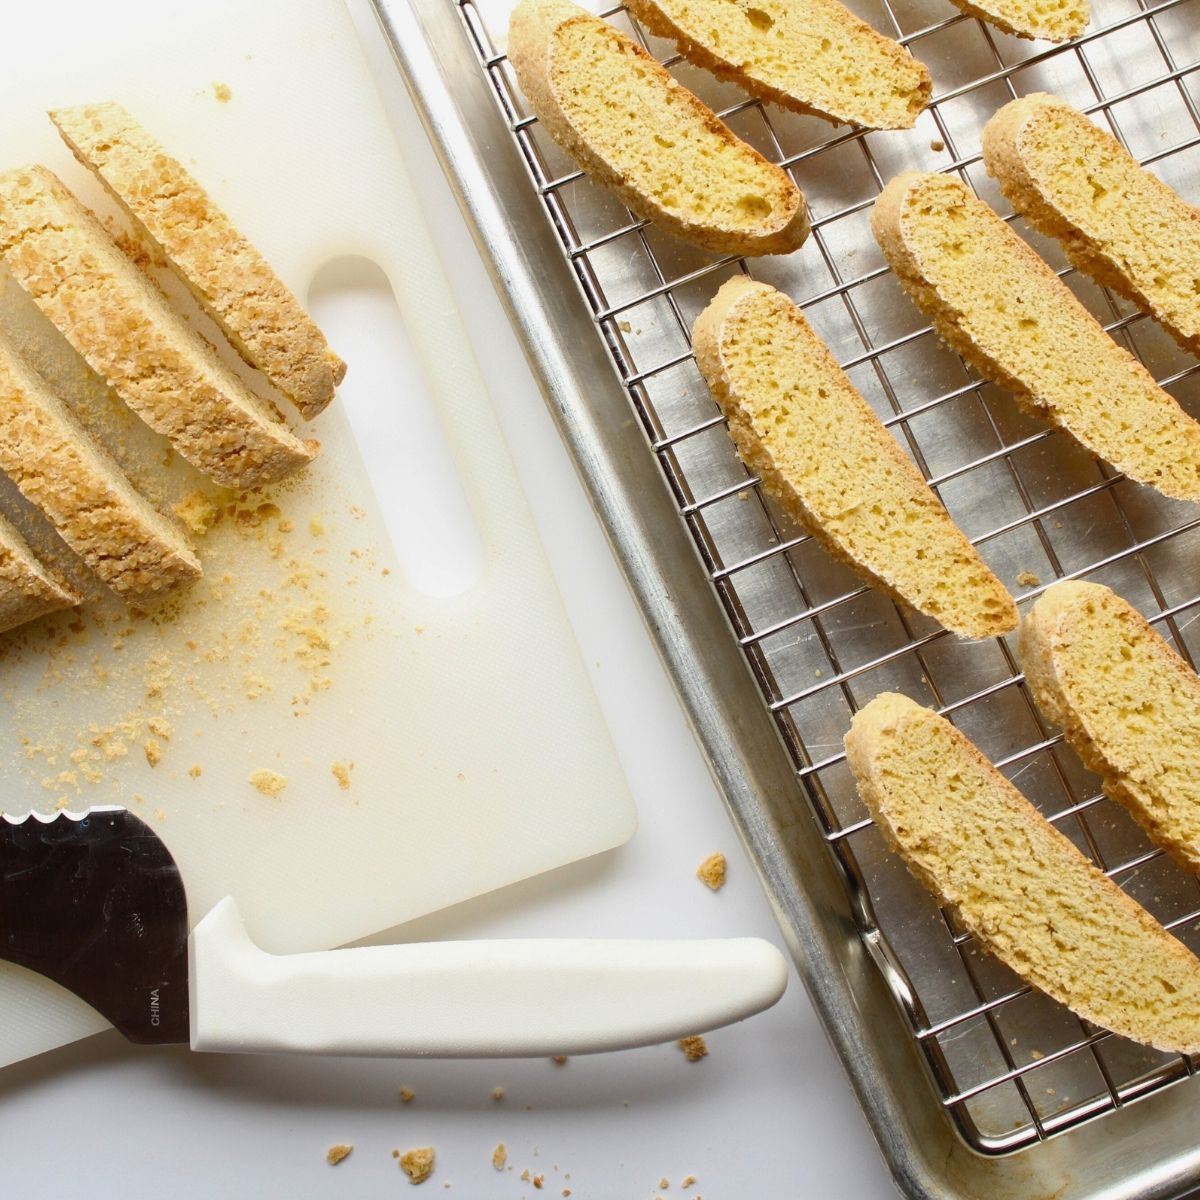
Bake the logs on day one, then wait until the next day to slice them. They are much easier to cut cleanly once fully cooled and set. Then simply toast the slices for their second bake. You will get smoother edges and more even pieces.
White Chocolate Lemon Biscotti
Ingredients
- 2 cups unbleached all-purpose flour
- ¼ teaspoon baking powder
- ¼ teaspoon salt
- 1 cup sugar
- 2 large eggs
- ½ teaspoon vanilla extract
- 8 ounces white chocolate melted
Instructions
- Cool completely on a wire rack. Dip the flat side of each biscotti into melted white chocolate or candy melts. Place on parchment paper to set. Drizzle additional chocolate over the tops if desired. Allow chocolate to fully set before storing or freezing.
- Preheat the oven to 350 degrees F. Line a large baking sheet with parchment paper.
- In a medium bowl, whisk together flour, baking powder, and salt. Set aside.
- In a large bowl using a handheld electric mixer, or in the bowl of a stand mixer fitted with the paddle attachment, beat sugar and eggs until light in color and slightly thickened, about 3 minutes. Mix in vanilla extract and lemon zest until combined.
- Add the flour mixture to the wet ingredients and mix on low speed just until combined. The dough will be thick and slightly sticky. Do not overmix.
- Divide dough evenly into two portions. On the prepared baking sheet, shape each portion into a log about 13 inches long and 3 to 4 inches wide. Gently pat the tops smooth and slightly flatten the logs.
- Bake for 35 minutes, until golden brown and beginning to crack on top. Remove from the oven and cool for at least 10 minutes. For even cleaner slices, wrap and wait until the next day to slice.
- Reduce oven temperature to 325 degrees F. Using a serrated knife, slice logs diagonally into ¾-inch thick pieces. Thicker slices will be slightly softer in the center. Thinner slices will be extra crisp. The end pieces are perfect for nibbling.
- Place slices cut side up in a single layer on the baking sheet. Bake for 15 minutes, flipping halfway through, until dry and crisp.
More Make Ahead Treats You’ll Love
S’mores Snack Mix
Salted Caramel Popcorn
DIY Pancake Mix Recipe
Mason Jar Chocolate Chip Cookie Mix

Deborah Lullo says
How much lemon zest?