


Why You’ll Love This Sourdough Pizza Dough Recipe
- Easy same-day dough
- Mix in one bowl. No stand mixer needed
- Delicious chewy sourdough crust
Since 2021, this sourdough pizza crust has been made hundreds of times and continues to be a reader favorite. With comments like this, you know it’s going to be good.
Jennifer C says…
⭐⭐⭐⭐⭐ I don’t think we will ever order pizza again! It was so delicious!
Pinterest Reader says...
I can't remember if I've commented before but I love this recipe. Turns out amazing every time, even when I let it sit in the fridge too long. We have pizza 2-3 times a month now and have since last summer. I'm so glad I can have pizza again!
Sheena says...
⭐⭐⭐⭐⭐This is absolutely delicious. best homemade crust I've ever made. great texture!
Another Reader says...
Perfectly crisp yet airy, and the pillowy crust reminded me of a Texas Roadhouse roll. I’ve been baking with sourdough for over a year, and this is hands down my favorite recipe yet.
If you try this recipe, please leave a review so that other bakers can find and enjoy this recipe too!
Ready to Make the Best Sourdough Pizza Crust of Your Life?
This crust hits that perfect balance: soft and pillowy on the inside, crisp and golden on the outside, with just enough sourdough tang to keep you coming back for more. Let's answer a few questions so you can be ready to make great pizza at home.
How Long Does It Take To Make Sourdough Pizza
Homemade sourdough pizza crust takes about 6 hours from start to finish. That includes mixing, the dough rise, shaping, and baking. If you start before noon, you can have fresh pizza ready by dinner.
When To Feed Your Sourdough Starter
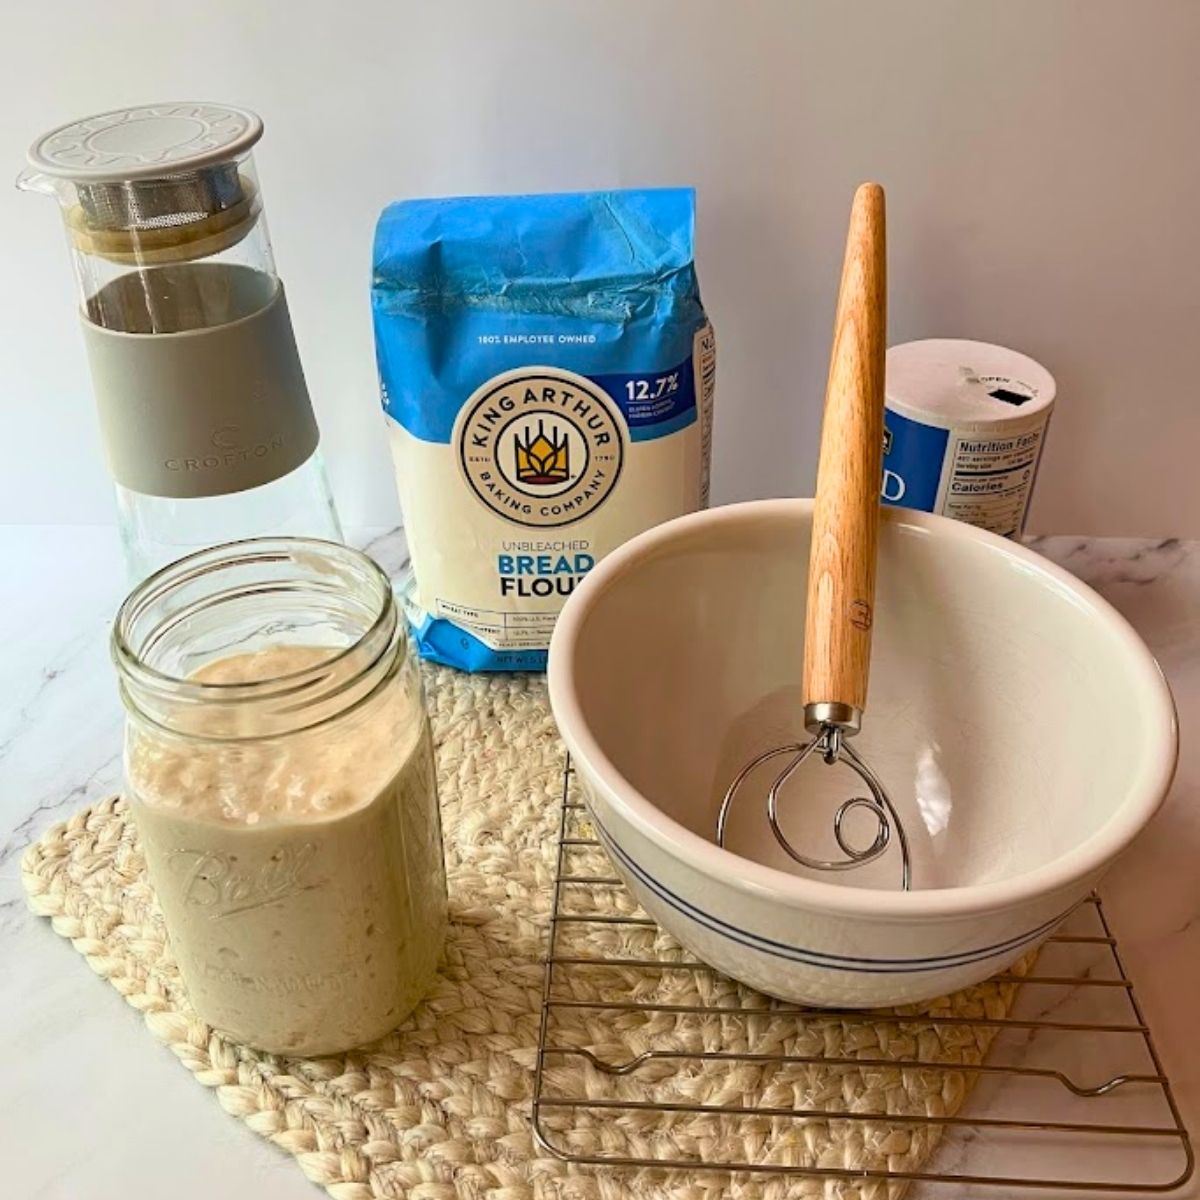
This recipe uses 1 cup of sourdough starter (about 225 grams), so you’ll want to feed your starter ahead of time to have enough ready. If you’re mixing your dough in the morning, feed your starter the night before so it’s active and bubbly when you need it.
To build enough starter use:
- ½ cup sourdough starter (75g)
- ½ cup bread flour (75g)
- ⅓ cup water (75g)
Stir everything together and let it sit at room temperature overnight. By morning, you’ll have about 1 cup of active starter for your recipe, plus a little left over to keep your starter going for the next feeding.
How to Make the Best Sourdough Pizza
When it comes to crafting the perfect sourdough pizza crust, the secret starts with pure and simple ingredients, but here's the deal: it's all about high quality.
Now, I can't stress this enough. Don't even think about substituting all-purpose flour in this recipe. High-quality bread flour is the superstar here, and it's worth every penny. This flour is what takes this recipe from good to absolutely incredible. It's the key to achieving that chewy, dreamy crust.
Bread flour- I like King Arthur Bread Flour for its high protein content, which gives great chew and structure. But don’t stress. Use whatever bread flour you can find locally.
Sourdough starter- Feed it the night before so it’s active and bubbly in the morning when you’re ready to mix your dough.
Salt- I use non-iodized table salt most often, but kosher salt or Himalayan pink salt both work well.
Water- I always use filtered water when working with sourdough. It keeps the wild yeast happy and helps avoid any interference from chlorine in tap water.
How to Mix Sourdough Pizza Dough
In a large bowl, combine your warm water and active starter. Add the bread flour and salt, and mix until a shaggy dough forms.
You can mix by hand or use a stand mixer with a dough hook attachment. Just make sure all the flour is fully mixed in and there are no dry spots.
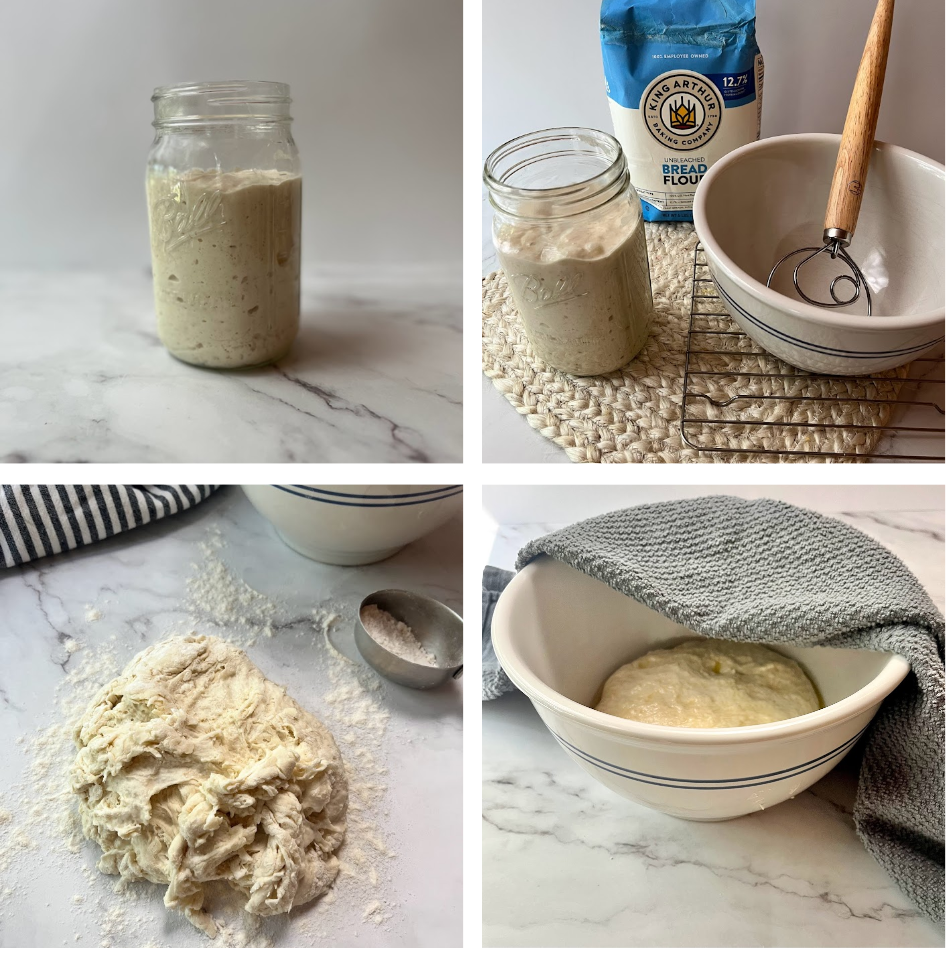
Stretch and Fold for Stronger Dough
After you mix your sourdough pizza dough, cover it and let it rest for about 45 minutes. This helps the dough relax and makes it easier to work with.
Next, do a stretch and fold. Grab one side of the dough, pull it up, and fold it over the middle. Turn the bowl and repeat a few times until you have gone all the way around. This helps make the dough stronger so your crust turns out chewy and not flat.
Cover the dough and let it rest for 45 minutes. Then do one more stretch and fold.
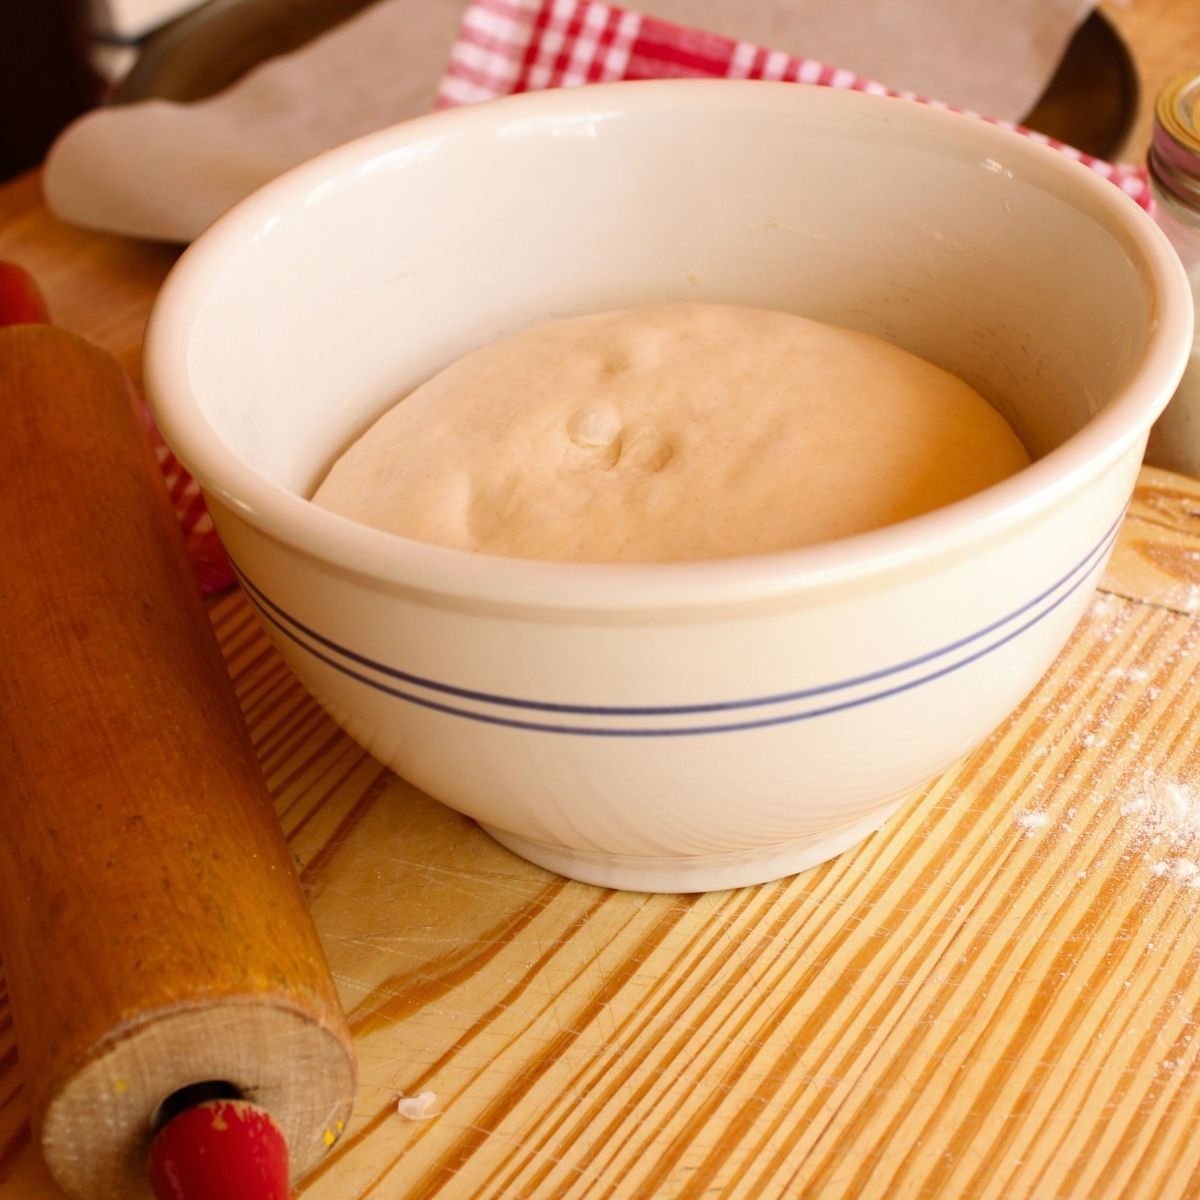
After that, you will start the main rise, called bulk fermentation. This is the long rise that takes about 4 to 6 hours.
The timing depends on how warm your kitchen is, how active your sourdough starter is, and even how warm your water was.
How Do You Know When the Dough Is Done Rising
Your dough is ready when it has doubled in size, looks puffy, and has small bubbles throughout. When you gently press it, it should feel soft and spring back slowly.
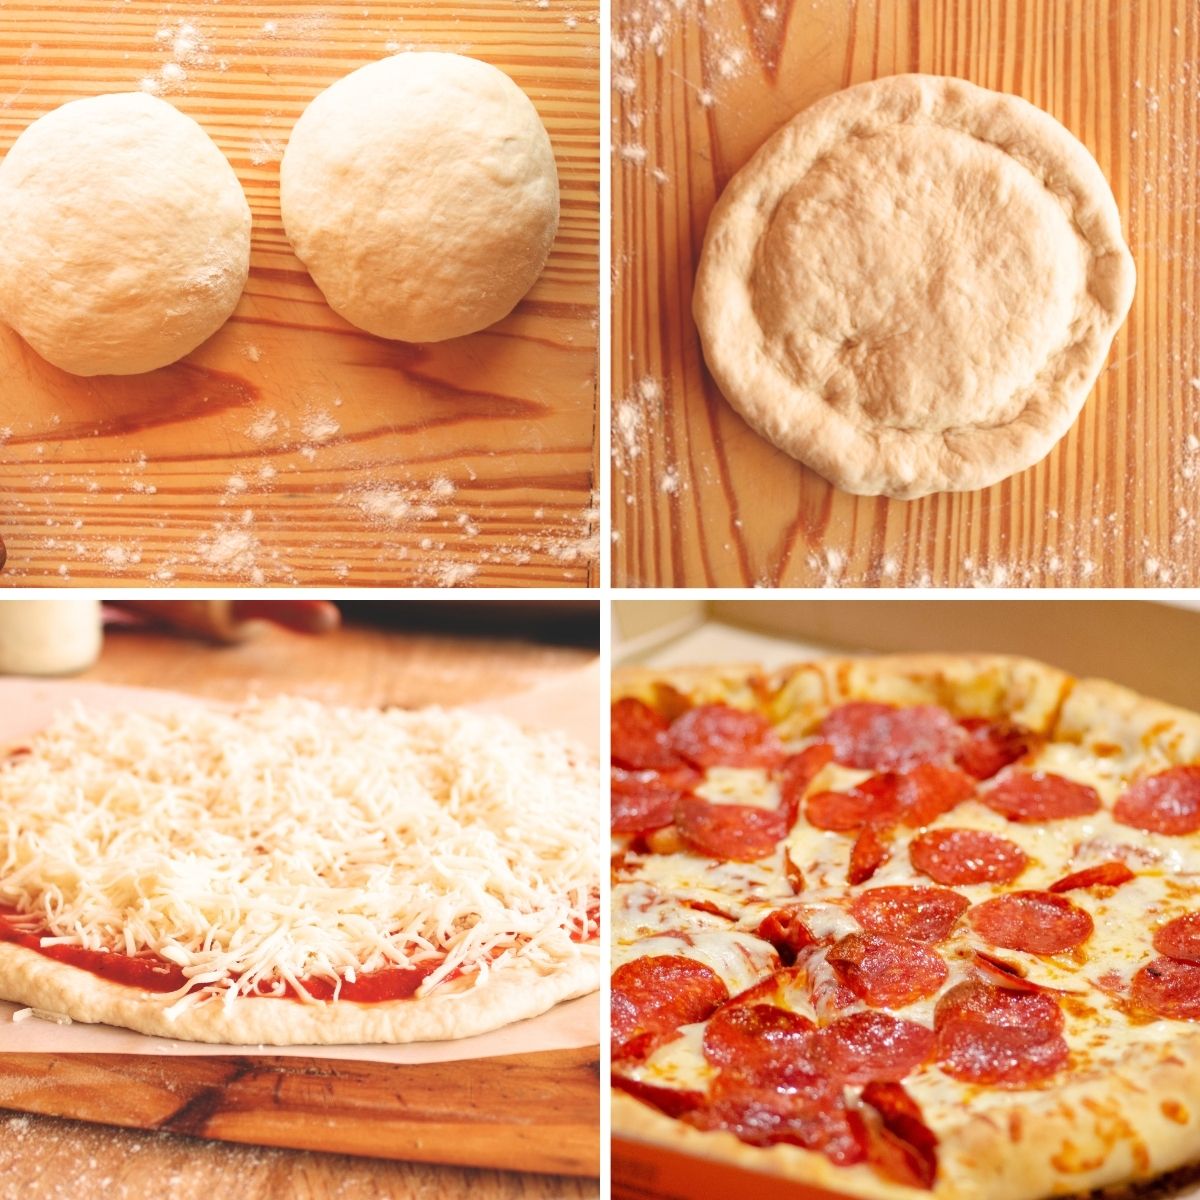
How to Shape Sourdough Pizza Dough
After bulk fermentation, turn the dough onto a lightly floured surface and divide into 2 dough balls. Gently round each one, then cover and let rest for 20 minutes while you preheat your oven to 475 degrees.
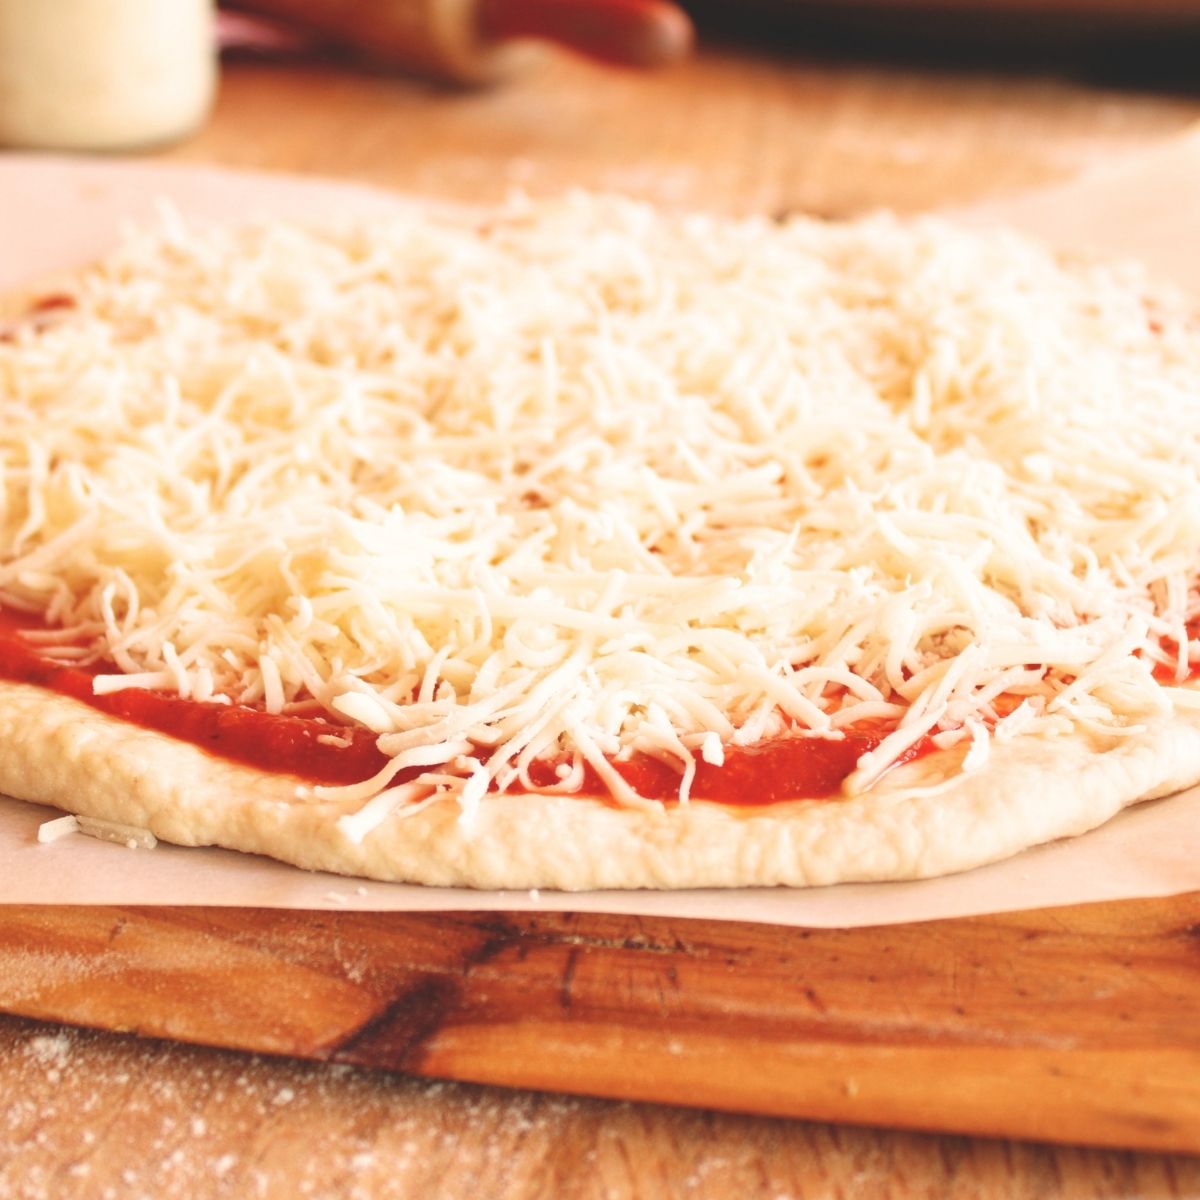
To shape, press a ring about an inch from the edge to create a border. Then press the dough from the center outward, keeping that outer ring thicker.
That edge will puff up in the oven and give you a soft, chewy crust with a golden, crisp finish.
Can You Refrigerate Sourdough Pizza Dough for the Next Day
Yes, this dough works great with a cold proof. After the bulk ferment, place the dough balls in the fridge.
The next day, let them come back to room temperature before shaping. This slower ferment adds even more flavor to your sourdough crust.
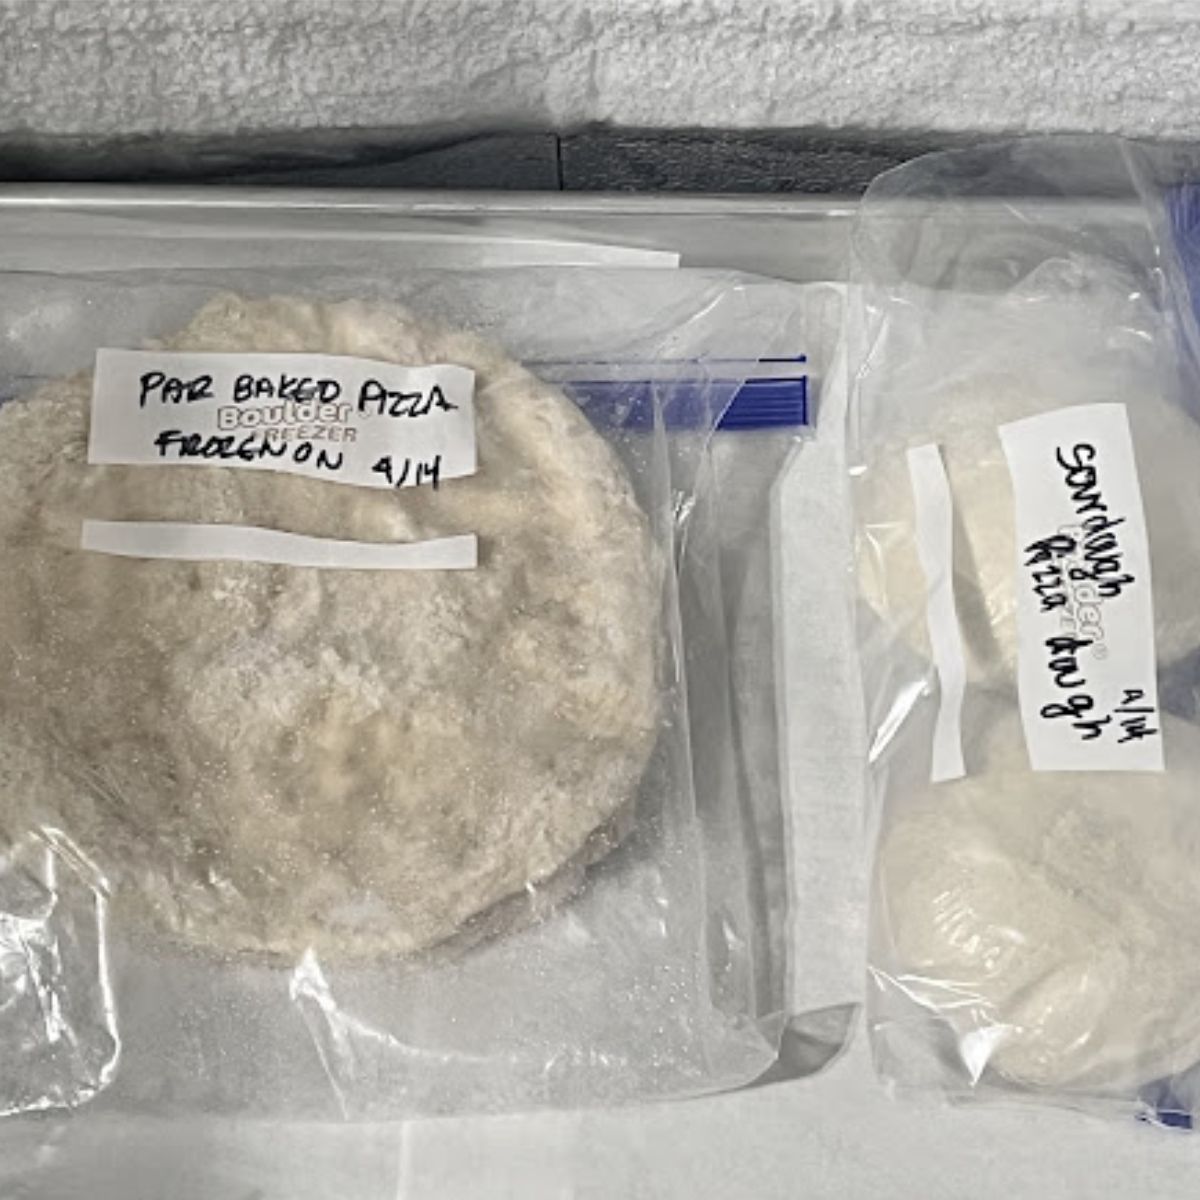
Can You Freeze Sourdough Pizza Dough
I get this question all the time. Yes, you can absolutely freeze sourdough pizza dough for later.
I have a full blog post that walks through both freezing unbaked dough and par-baked crusts. If you want all the details, you can read that here.
If you just need the quick method, this is the easiest way:
- Lightly coat each dough ball with olive oil
- Place in a freezer-safe bag and seal
When you are ready to use it, thaw the dough overnight in the fridge. Then let it sit at room temperature before shaping and baking.
Sourdough Pizza Crust Recipe
Equipment
- Baking stone or baking steel
- Dutch whisk - optional
- Parchment paper - for transferring pizzas to the oven
- Pizza Peel
Ingredients
- 2 ½ cups Bread Flour 10oz, 300g
- ¾ cup Water 6oz,170g
- 1 cup Sourdough Starter 8oz, 225g
- 1 teaspoon Salt 0.25oz, 7g
Instructions
- In a large mixing bowl, combine warm water and active sourdough starter. Add bread flour and salt. Mix until a shaggy dough forms and no dry flour remains.
- Turn the dough onto a lightly floured surface and knead for about 5 minutes, until smooth and elastic. You can also use a stand mixer with a dough hook.
- Place the dough back in the bowl and let it rest for 45 minutes. Perform one stretch and fold, then let it rest again for another 45 minutes and repeat.
- Cover the dough and let it rise in a warm spot for 4 to 6 hours, or until puffy and slightly doubled.
- Turn the dough onto a floured surface and divide into 2 large dough balls or 4 smaller portions for personal pizzas.
- Cover and let the dough rest at room temperature for 30 to 60 minutes to relax the gluten.
- Preheat your oven to 475 degrees. Place a pizza stone or baking steel in the oven while it heats.
- On a lightly floured surface, press and stretch the dough into a round. Leave a slightly thicker edge for the crust.
- Transfer the dough to a piece of parchment paper. Add sauce, cheese, and your favorite toppings.
- Use a pizza peel to transfer the pizza onto the hot surface. Bake until the crust is golden brown and the cheese is melted and bubbly.
- Let cool for a few minutes, then slice and serve.
Notes
- For a same day bake, feed your starter the night before so it’s ready in the morning.
- If your dough is hard to stretch or keeps shrinking back, let it rest for 10 to 15 minutes before shaping.
- Bake your pizza in a very hot oven for the best results. A hot surface helps create a crispy bottom crust.
- Bread flour gives the best chewy texture. All purpose flour works, but the crust will be softer.
- You can refrigerate the dough after the first rise for up to 24 hours. Let it come back to room temperature before shaping.
My Favorite Pizza Tools
- Pizza stone + peel set
- Pizza steel
- Table top pizza oven
- Pizza cutter
- Dutch whisk
- Active sourdough starter
More Pizza Resources
Sourdough Discard Pizza Crust Recipe Freezing Pizza Dough Pizza Stone vs. Pizza SteelMore Sourdough Pizza Dough Tips
-
How to Make Sourdough Pizza Dough with Discard – A great way to use up extra starter without sacrificing that chewy, flavorful crust.
-
How to Freeze Sourdough Pizza Dough – Step-by-step instructions to help you prep ahead and always have dough on hand when the craving hits.
Whether you're baking for a weeknight dinner or planning a backyard pizza night, these guides will help you make really good pizza!
Brandi Aldrich says
The actual recipe calls for 1/4 cup starter., when you hit visit. The recipe when you first open, calls for 4 cups, I only use the 1/4 and it did not rise, was not bad, just made one thin crust. I looked up a few other recipes and they called for one cup. So not sure what the amount should be.
Better Baker says
Thank you for pointing that out. I've tested and updated the recipe with the correct sourdough starter amount!
Shannon says
When you updated the amount of starter did that change the amount it makes?
In the description at the top it says it makes 3 individual or 1 large. In the actual recipe it says 4 individual or 2 large. Just wanting to know which is correct.
Thanks.
Better Baker says
Hi Shannon, I've corrected that typo. The recipe makes 1 large or 3 individuals. Thanks for point that out. Hope you enjoy the recipe!
Will says
There's also a typo in the recipe for the amount of flour. "13 oz, 3g"
I'm guessing that's supposed to be something like 364 g?
Karen Martin says
When you make and then freeze, when you want to use, how long do you have to thaw the crust before you use them.
Suzanne says
This looks so good! What a fun way to use sourdough! Does it affect the flavor much?
Vanessa says
Thanks for sharing! Does the crust keep long after baked?
Better Baker says
Hi Vanessa, So glad you enjoyed the recipe. I like to par-bake the crust ( bake until the dough is set, but not brown) and freeze them. They keep about 4 days at room temp or 3 months in the freezer.
Amanda says
Approximately how long would you say the rise takes to double in size? After the rise and 20 min rest, could I refrigerate the balls until dinner? Thank you!
Suzanne says
This looks I didn't know sourdough could be be made into pizza dough too! What a great way to keep the tummy happy!
Vanessa says
Thanks for sharing! Do they keep long?
Whitney says
I’m wondering if I could substitute Einkorn flour in place of the bread flour? My daughter does better with Einkorn and it has a higher protein content as well.
Michele C says
I desperately need help. Everything I’ve tried with my sourdough starter has failed. I know it’s my starter and not your recipe, but I don’t seem to be able to get a thick starter and I’ve been trying for 2 months now. It bubbles, rises and smells but it doesn’t look like everyone’s I’ve seen that is a good starter. I had to throw out the whole mess. Any thoughts?
Lauren Lutuvakula says
Hi!
Can these be baked frozen or do they need to thaw?
Thank you,
Lauren
Julie says
We loved it! I made it with active starter (unsure if it’s ok for discard??) and made two small pizzas and 1 medium with the dough. It was a bit hard to roll out, it kept wanting to shrink back. Overall though it was the best pizza dough we’ve ever made at home! It’s a keeper for us
Tamara says
can these be baked frozen?? or how long do they need to sit out prior to baking. there are no directions to frozen crust.
Better Baker says
If you are freezing the crust as par baked, you can bake them frozen. If you froze the dough then it should thaw and come to room temperature before baking.
CJ says
Hi! I'll be par-baking and freezing my crusts as instructed but I couldn't find instructions on how to cook the crust after freezing? Do I let it thaw before saucing and topping and baking or do I sauce and top then freeze? Do I bake from frozen?
Kekentia says
@Michele C, I had a terrible time w my starter until I started using bread flour to feed it, as opposed to AP. Not sure what other people use or what you are using but that’s just my experience. And I had to start feeding it twice a day u til it built up enough strengths to hold its own 😉 good luck!
Emily says
So I just realized that I made the dough with discard and not active starter🤦♀️ will it still rise?
Better Baker says
Oops! It may rise, just a little slower.
Cortney says
*at all
Paula Nelson says
@Cortney, I think you'll have better luck weighing ingredients than measuring. My batch is looking good!
Gio says
@Whitney,
I make it for my sister who has issues with standard flower and it works very well. She’s happy and the process wand weights are about the same.
Jennifer Clark says
I don’t think we will ever order pizza again! It was so delicious!
I wish I could add pics of my delicious pizza!
Jess W says
@Michele C, the type of flour you use is key. I use organic flour (unbleached & unenriched) to feed it—then save my bread flour for baking bread. You can stir it every 6 hours to incorporate more oxygen into it. You can also feed it twice a day (as long as you’re still discarding about 1/2 each time before you feed it).
If you need it to be more stiff, you can feed your starter only flour for one feeding or give it a bit more flour than water. I do this with mine and it has stiffened up as needed and has become stronger.
Better Baker says
Hi Sarah, you can freeze the dough by shaping the crust and freezing it on a sheet pan. Once the crust is frozen solid you can package it in a plastic bag and store it in the freezer until you need it. When you're ready to bake it just place it on the pizza pan and allow it to thaw for about 15 to 20 minutes before topping and baking. I hope this helps thank you for commenting and visiting my blog.
Better Baker says
Hi Jennifer, I am so thrilled to hear that you loved this pizza dough recipe so much. I would love to see pictures of your delicious pizza I bet it is beautiful! Thank you so much for commenting and visiting my blog!
Sue says
@Better Baker,
Can you just freeze the dough balls without parbaking them? Figured it would take up less space in the freezer
Better Baker says
Hi Sue, thank you for visiting my blog! To answer your question- yes, you can freeze the dough balls without parbaking them. They may rise a little less after defrosting, but that can also be affected by how long you leave the dough in the freezer. Please keep us posted if you give it a try!
Autumn says
The first time I made this only two of us had a pizza so I refrigerated one portion for about two days. It was even better than the freshly made dough! The flavor was much more sour and the texture was phenomenal. I'm adding that step to my prep from now on.
Better Baker says
That's a great idea, thanks for sharing!
Better Baker says
Great question!To bake a par-baked pizza, defrost the crust, top with sauce, cheese and toppings, and bake at 400 degrees F for 8-12 minutes or until browned to your liking.
Better Baker says
I totally understand! I was traveling for several months and my starter died. I ordered a new starter on Amazon and it was AMAZING! I fed it according to the instruction and baked my best loaf ever just 3 days later. Here's the link to the one I bought: https://amzn.to/3I2Q58t
Lizzy Steinhauer says
Hi there. Approximately how long does this take to double? Trying to figure out when to start it. 🙂
Better Baker says
With my sourdough starter, it takes about 4 hours to double.
Nancy says
Has anyone used a mixed to make and need dough?
Victoria says
@Michele C,
When you feed, use less water. That is what helped mine. Keep going. It took me three times and a lot of experiment to get mine going.
Drew says
Do you want the dough to rise before freezing? Like prep the dough, not par baking.
Better Baker says
Yes, because after freezing the yeast is much less active.
Better Baker says
Thanks for sharing your tips!
Amber says
My MIL loves pizza and I'd like to give her a healthier option than the frozen ones she makes now. Can I add the toppings before freezing and vacuum seal so she can just put it in the oven when she is ready?
Lisa says
OMG! This might be the best pizza I’ve ever had.
Better Baker says
That sounds like a great idea!
Better Baker says
Hi Lisa, thank you so much for trying my recipe and taking the time to comment. I hope it becomes your new favorite pizza crust recipe!
Better Baker says
I've gathered together all the tips for freezing sourdough pizza dough into this article: https://betterbakerclub.com/can-you-freeze-sourdough-pizza-dough/
Andrea says
For gluten intolerance can these sit longer after the 20 min rise?
Better Baker says
I don't have direct experience with fermenting sourdough specifically for gluten intolerance, but I have allowed the dough to sit longer than the usual time with no issues.
Jennifer says
This is very similar to how I make mine. Here’s another suggestion for making ahead. After I ferment my dough for a day or two, I par bake as you do, then top half my crusts for dinner that night and finish baking (I always double), the other half gets topped but then I wrap in plastic, then in foil for freezing. I label and when ready to cook I preheat to 450 and bake on a pizza or cookies sheet for 15 minutes. They turn out AMAZING!!! We’ve done this for bringing on vacation, last minute movie or game nights and even stock piled a bunch for parties. We have yet to get delivery since starting this practice. They’re also great to give to new moms or others in need of easy meals etc.
Kailey says
Can you freeze dough before after step 7 before cooking?
Better Baker says
I have not tried freezing the dough myself, but if you do, please let me know how it turns out! It could be a great way to save time. Happy baking!
Better Baker says
That sounds fantastic! Thank you for sharing your method and tips for making ahead. Par baking and then freezing the topped crusts is a brilliant idea, especially for busy nights or special occasions.Happy baking!
Nina says
@Autumn, Did you refrigerate your dough before or after the rise?
Dawn says
Turned out great and so easy compared to others I have tried. I make it for company often. Everyone raves about it.
My only suggestion is that you update the conversions to grams for 2x and 3x the recipe. They do not change when I click on them. The US measurements update when the 2x and 3x are touched.
Better Baker says
Thank you so much! I'm thrilled to hear the recipe turned out great and that it's a hit with your company! I appreciate your feedback about the gram conversions not updating—I’m working on an update to fix that. Stay tuned! 😊
Sheryl says
@Michele C, I had a hard time with my starter until I understood the feeding process. My friend recommended a 1:2:2 ratio of starter, water, flour. It works great for me and I have good results. Best of luck to you.
Bri says
Love the taste of the dough, but I keep getting a tough bottom! I’m preheating the oven with the pizza stone and preparing the pizza on parchment paper to put in the oven when preheated. Any suggestions?
Daniell says
Turned out great! Slightly altered recipe to make a gluten free crust as well. Delicious! Thank you!
Brooke says
How long can you keep the dough in the refrigerator until ready to use?
Sheryl Underwood says
@Daniell,
I would lIke directions on gf alternative if you can share.
Thank you
Jen says
@Michele C, is it thinner than others? If so, try feeding it using 1/2 cup starter, 1/2 cup flour, and less than 1/2 cup of water a few times.
Arden says
Loved this recipe! Delicious and easy, the dough was easy to roll out. I added some garlic powder and dried basil to the dough as I added the flour and it worked really well!
Better Baker says
Thank you so much! I'm thrilled you loved the recipe! Adding garlic powder and dried basil sounds like such a flavorful twist—great idea!
Better Baker says
Great question! You can usually keep the dough in the refrigerator for up to 24-48 hours. Letting it rest longer can sometimes even enhance the flavor! Just be sure to bring it to room temperature before using.
Better Baker says
Thank you for sharing! I'm so glad it turned out great. Your gluten-free twist sounds amazing—well done!
Maria says
Woooooow! I made 5 large pizzas last night with this recipe and they turned out amazing! I prepped them the night before popped them into the fridge then brought out the next day to come to room temp to shape into pizzas and wow! They were a huge hit!
Daria says
Are we using sourdough discard or active starter for this recipe. I would like to make 16 inch pizza pies, but don’t know how much I need to double or triple this recipe in order to do so.
Better Baker says
This recipe makes one large pizza (about 14-16 inches, depending on how long you let the dough rest and relax the gluten).
It uses active sourdough, but if you're looking for a sourdough discard version, you can find that recipe here: https://betterbakerclub.com/sourdough-discard-recipes/
Susie says
I made this today per the recipe, but the dough was so loose that we had to turn it into focaccia because it couldn’t be divided for pizza. Should it have been more than 300 grams of flour?
Jamie L says
Can I put all the ingredients in my stand mixer and mix for 5 minutes?
Better Baker says
Yes! You can add all the ingredients to your stand mixer and mix for about 5 minutes.
Katelyn says
Works pretty well
James says
I just made your recipe to a tee. I weighed out everything and once dough was done I put it in a bowl with olive oil to coat it and covered in Saran Wrap. Preheated my pizza steel at 550 for a good 30-45 minutes and baked a full size pizza topped half with traditional pepperoni style, and the other half with pesto, ricotta, sun dried tomatoes, mozzarella, and little drips of fig butter. I baked on broil for 9 minutes and the undercarriage was so perfectly crisp yet airy, and the pillowy crust was reminiscent of a Texas Roadhouse roll! I will make copycat cinnamon butter for a dipping twist next time. Oh, and I am a habitual violator for making tons of recipes from Pinterest and not writing a review. However, I’ve been doing the sourdough baking for a little over a year now and this was by far my favorite dough recipe. The devil is always in the details though… make sure you have a super hot steel, active starter, and a lot of love and you are destined to love this:) thanks for sharing
Lexie says
My dough rose way faster than I expected. I don’t need to bake for a few more hours.. what can I do so it doesn’t over proof??
Better Baker says
Go ahead and shape the dough into the size balls you want for your pizzas, then pop them in the fridge until you’re ready to bake. This is actually how they do it in pizza restaurants, and it should work just fine for up to 24 hours.
Better Baker says
Wow—thank you so much for this amazing review! Your topping combos sound incredible (that fig butter twist... genius) and I’m so glad the crust turned out crisp, airy, and pillowy—exactly what I was going for. And hearing it reminded you of a Texas Roadhouse roll made my day.
Marley says
The best sourdough crust recipe! And ive tried a lot
Better Baker says
Thank you! I'm so glad you loved it!
Karen says
This makes a beautiful dough Ty so much for sharing
Diana says
Would this recipe work with gluten free bread flour?
Better Baker says
I have not tried it with gluten free flour, but if you do please let us know how it turns out!
Better Baker says
You are very welcome! Thank you for your kind comment!
Heather says
Completely failed. So incredibly disappointed. Doubled the recipe and followed the recipe exactly. It was so sticky I couldn’t work with it. Couldn’t even get it off the pizza stone after pare baking. Total waste of my time and ingredients.