


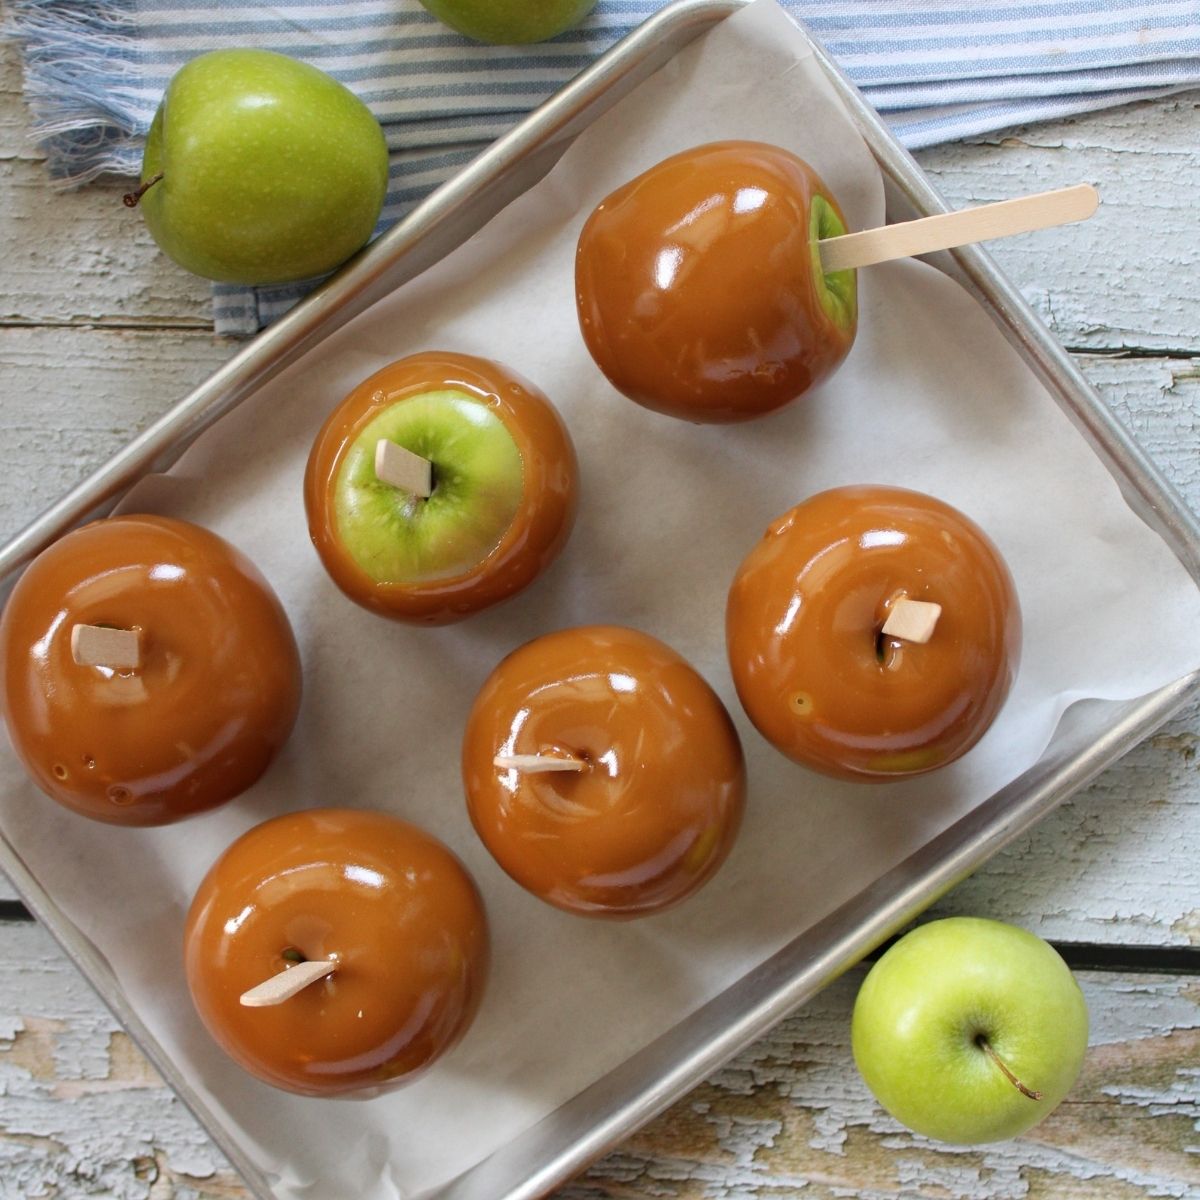
Homemade caramel apples are easier than you think. I’ll show you how easy it is to make perfect caramel apples from-scratch with caramel that sets perfectly everytime! I'll give you clear, step by step instructions for this beginner friendly recipe that is delicious enough to become your new fall tradition.
Follow me on social!
Why You’ll Love This Recipe
- Made from scratch with foolproof texture – You’ll cook a rich, creamy caramel that turns out soft, chewy, and clings to every apple without pooling.
- Beginner friendly – Clear, step by step instructions make the process simple and approachable, even if it’s your first time making caramel.
- Customizable – Enjoy them plain and shiny, or dress them up with peanuts, cookie crumbs, or a drizzle of chocolate.
If you love these homemade caramel apples, you might also want to try my Amish Fried Pies for another cozy fall classic, or bake up a quick Mini Apple Pie for Two when you’re craving something sweet but don’t want a whole pie.
Choosing the Best Apples for the Job
Not every apple works the same. The best apples for dipping are tart, crisp varieties that balance the sweetness of the caramel. I love Granny Smith for their crisp apple bite and bright green color. Honeycrisp or Fuji are also good if you want a sweeter finish.
You’ll notice a huge textural difference between a juicy apple and one that’s mealy. Always pick firm fruit for the classic caramel apple. Small apples are easier to coat and make delicious caramel apples that are manageable for kids at a birthday party or a fall market.
Tools That Guarantee Smooth, Even Caramel
The right tools make all the difference when you’re working with hot sugar. With these basics in place, you’ll avoid common mistakes and end up with smooth, glossy caramel apples every time:
- Heavy-bottomed saucepan – distributes heat evenly so the sugar doesn’t scorch.
- Candy thermometer – This one clips to the side of the pan and keeps you from guessing when the caramel is ready.
- Wooden spoon or sturdy spatula – strong enough to stir the thick caramel without bending or melting.
- Parchment-lined baking sheet or silicone mat – a must-have for setting apples once they’re dipped, and it makes cleanup easy.
- Popsicle sticks – Skip the cake pop sticks. These wooden sticks are sturdy enough to hold up any size apples.

Ingredients You’ll Need for Making Caramel
Homemade caramel isn’t complicated, but it does take patience. The secret is constant stirring and cooking to the right temperature so the caramel turns out smooth and chewy every time. Here’s what each ingredient does for the recipe:
- Brown sugar – The base of the caramel. Light brown sugar gives you a golden color, while dark brown sugar makes a deeper, richer caramel.
- Light corn syrup – Keeps the sugar from crystallizing so the caramel stays silky instead of grainy.
- Sweetened condensed milk – Adds body and creates the creamy, chewy texture that sticks to your apples.
- Unsalted butter – Brings richness and helps the caramel coat evenly.
- Salt – Balances all the sweetness and makes the flavor pop.
When you’re cooking caramel, remember: stir often, watch your thermometer closely, and trust the process. That’s all it takes to make perfect homemade caramel that clings to every apple.
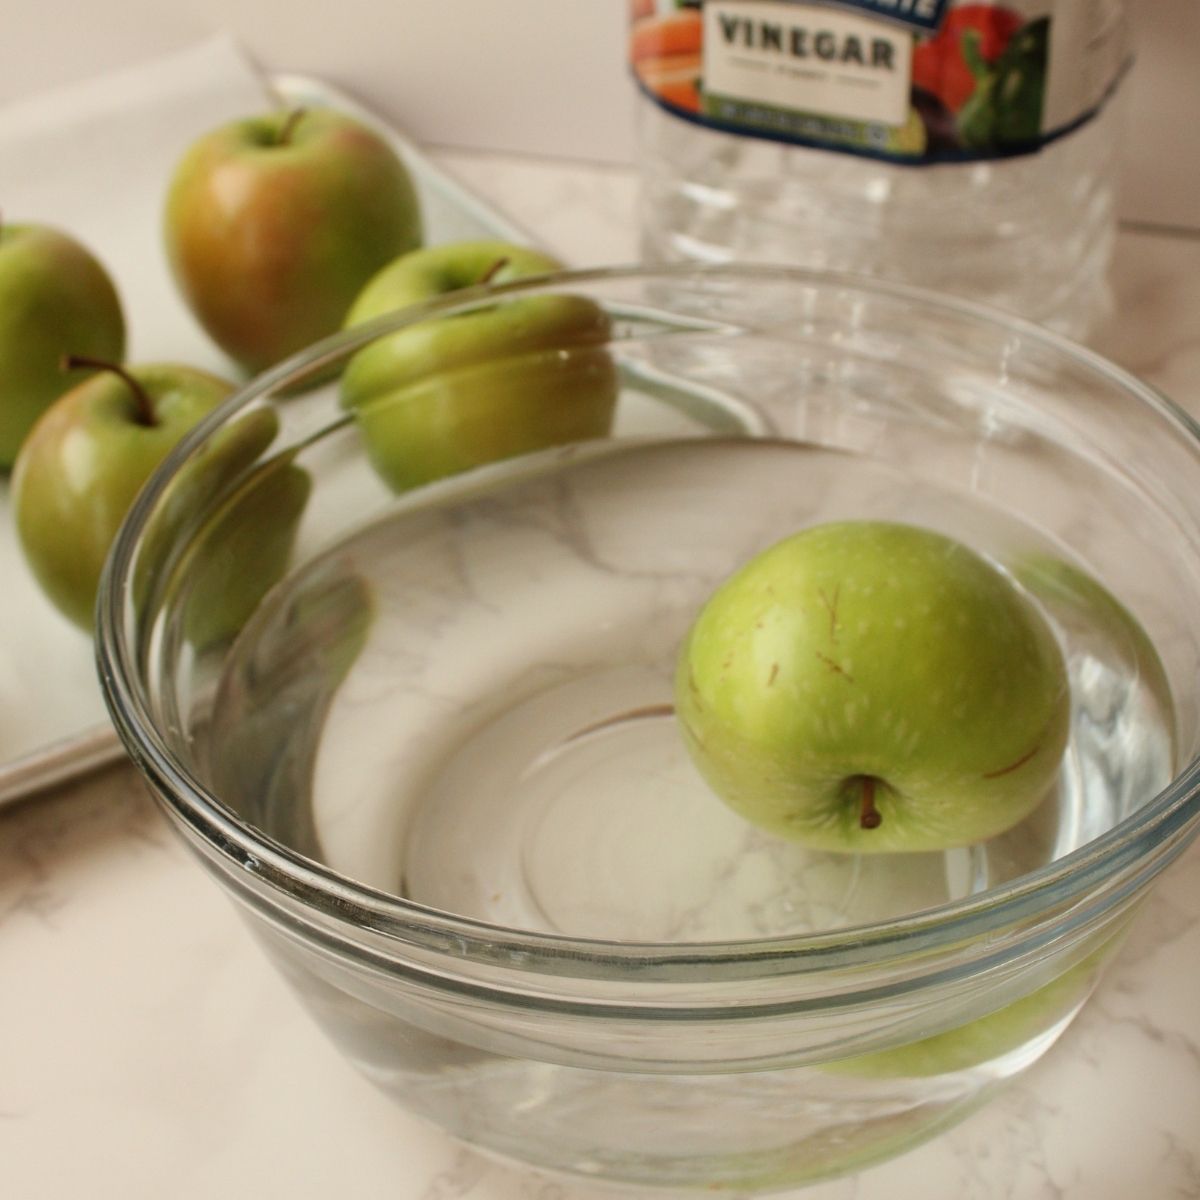
How to Prep Apples So Caramel Actually Sticks
The actual apple matters as much as the caramel. If you start with a waxy fruit straight from the grocery store, the coating will slip off.
Here's how to prep your apples
- Soak the apples in very hot water with a splash of vinegar to remove the wax, then dry them completely. I’ve learned the hard way not to skip this step!
- Room-temperature apples work best, since cold ones create condensation and a gooey exterior instead of a neat finish.
- Twist out stems, place apples on your pan, and insert sticks firmly into the center.
Setting Up Your Dipping Station for Success
Getting organized before you heat the caramel makes the whole process easier and less stressful. Here’s how I set up my station:
- Line your baking sheet with parchment or a silicone mat so apples release cleanly once the caramel sets.
- Prepare toppings in shallow bowls—nuts, sprinkles, crushed cookies, or chocolate chips—so you can roll the apples quickly while the caramel is tacky.
- Dry and stick your apples ahead of time. Insert sticks firmly into the center so they’re ready to dip the moment the caramel cools to the right temperature.
- Keep space clear near your stove for moving the caramel pot safely from cooking to dipping.
- Arrange apples in a row on the baking sheet, giving yourself room to set them down without bumping into each other.
Cooking Caramel to the Perfect Stage Without Stress
This is where the magic happens and where most people get nervous, but once you know what to watch for, it’s simple. Done right, you’ll end up with that buttery, chewy coating that makes the best classic caramel apples.
Combine All Ingredients
In a heavy-bottomed saucepan over medium-low heat, melt the butter. Once melted, add the brown sugar, sweetened condensed milk, light corn syrup, and salt. Stir constantly, scraping the bottom and sides of the pot to prevent scorching.
Allyson's Tips
Stir often and consistently. I can’t stress this enough...sweetened condensed milk will burn quickly if left alone. I keep my spoon moving around the bottom and edges of the pot the entire time.
Watch the Temperature Closely
Clip a candy thermometer to the side of your pot and keep a steady watch. You’re aiming for 230 to 240 degrees F, the “soft-ball stage.” At this temperature, the caramel sets chewy but not brittle. Too hot and you’ll get a hard outer shell like traditional candy apples; too low and the softer coating will slide right off the apple.
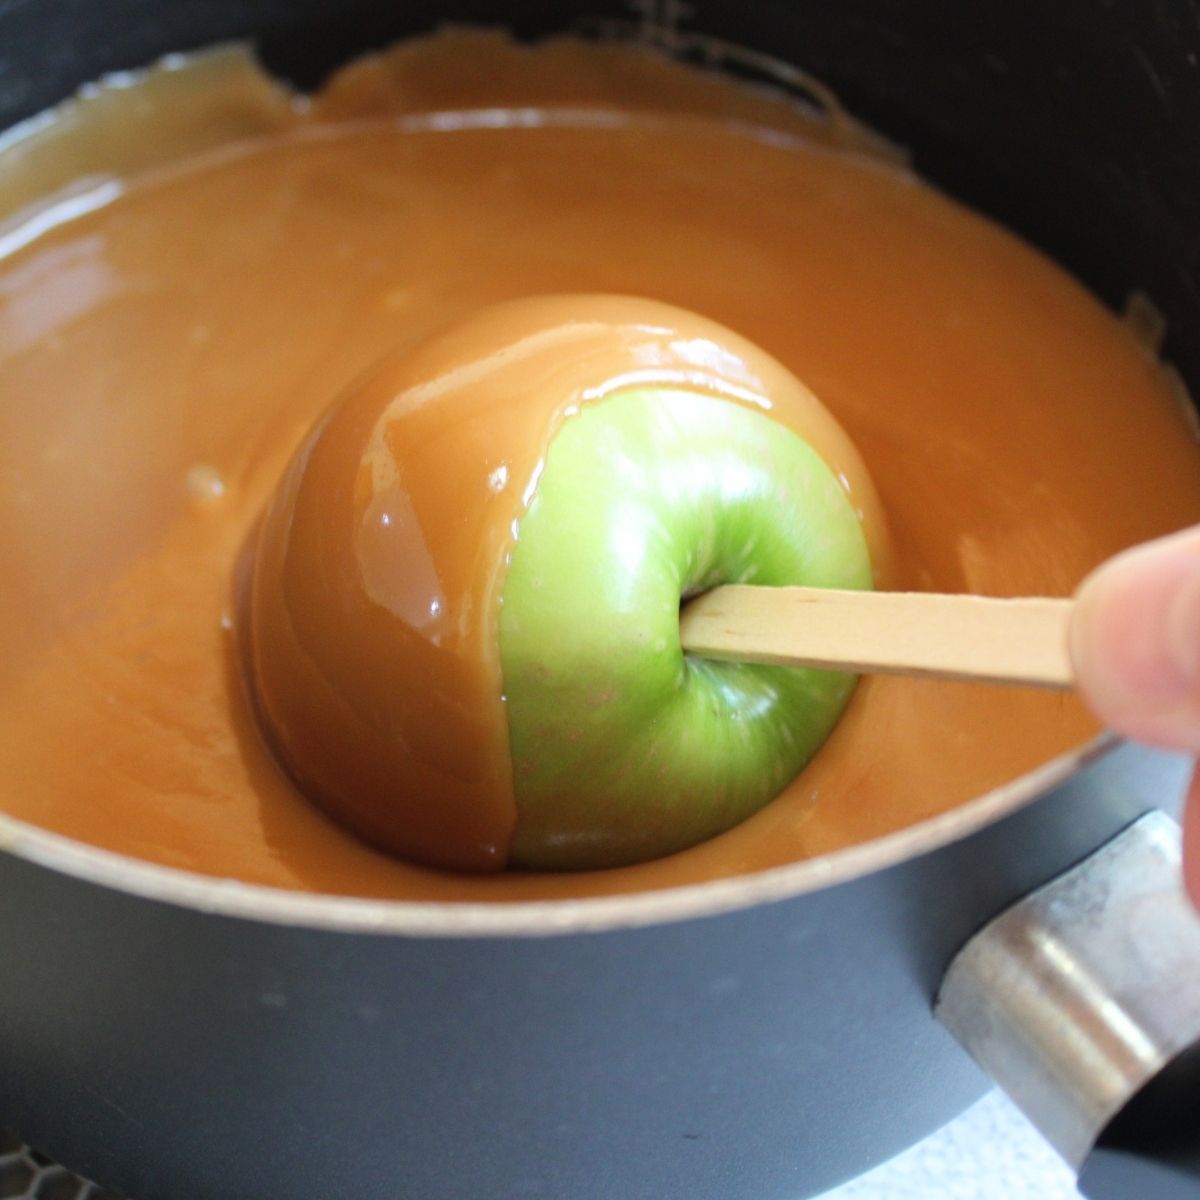
Cool for the Perfect Dipping Stage
Once you hit the right temperature, take the caramel off the heat. Let it cool to about 190 degrees F before dipping. This is the sweet spot where the caramel clings evenly to the apple without running. Too hot and you’ll see excess caramel pooling at the base; too cool and you’ll get ropes instead of a smooth coat.
What to Expect When It’s Ready
When the caramel is cooked and cooled properly, you’ll see a glossy texture and smell a warm, buttery sweetness.
Pro Tips for Dipping Apples Evenly
Dipping can be nerve-wracking but it's actually very easy. You'll just tilt the pot to one side, roll the apple through the caramel, and let the whole apple get coated. Scrape the bottom lightly to avoid puddles. Setting them on parchment keeps things neat.
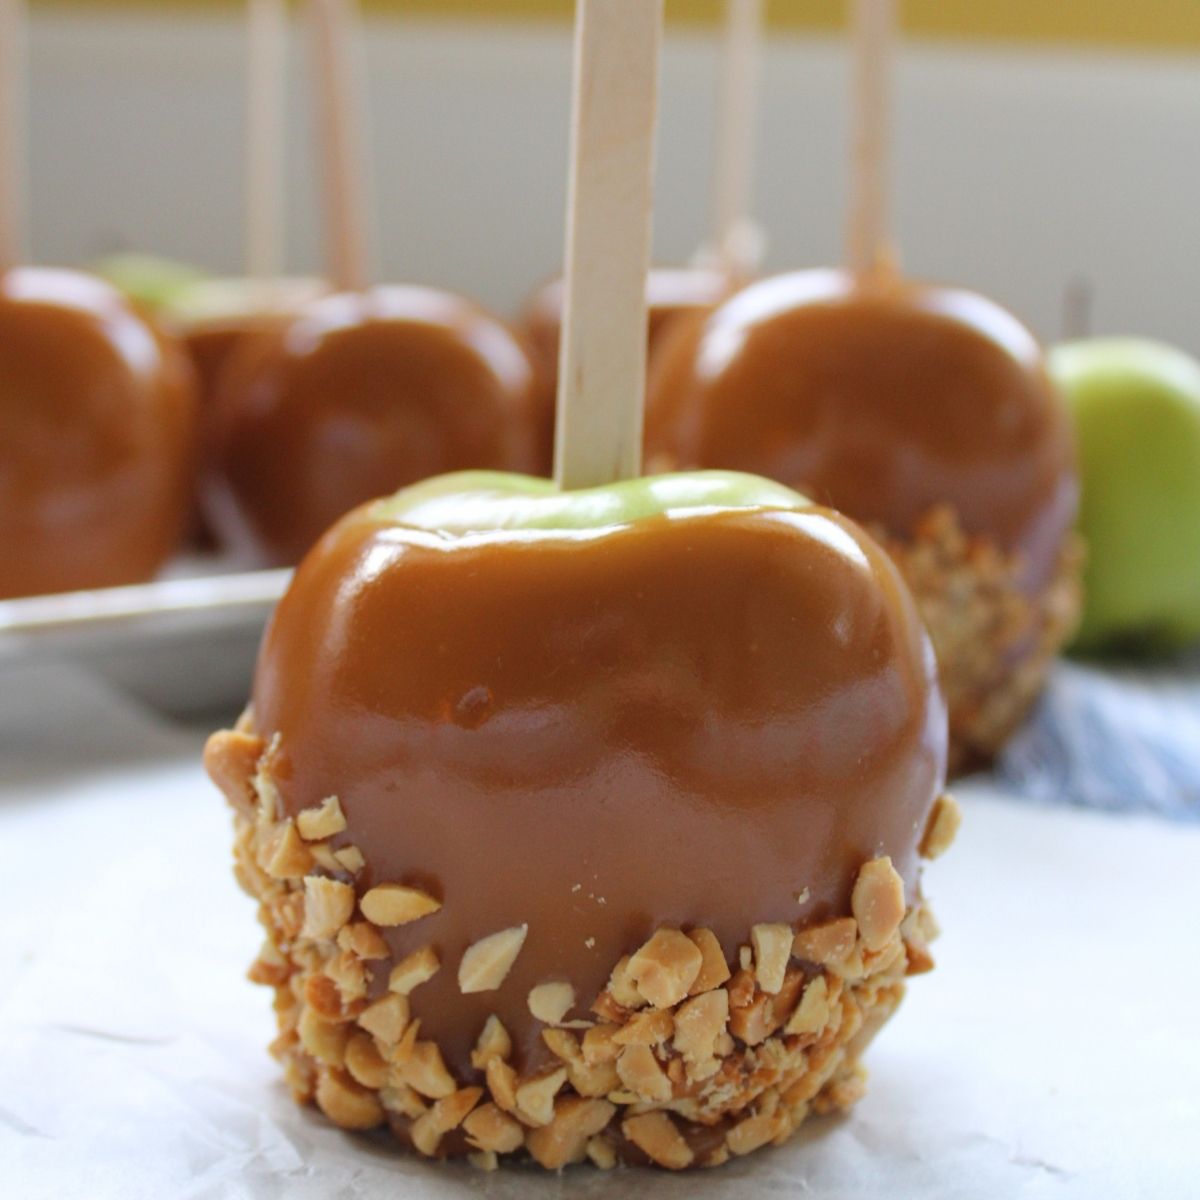
Adding Toppings To Caramel Apples
The best time to add toppings is while the caramel is still warm and tacky, but not fully set. Here are four flavors that always win over caramel apple lovers, plus exactly when to add each:
- Classic Peanut – Roll apples in finely chopped peanuts right after dipping, while the caramel is still sticky. Press gently with your hand so the nuts stay put.
- Chocolate Drizzle – Wait 10–15 minutes until the caramel has firmed up but isn’t rock-hard. Use a spoon or piping bag to drizzle melted dark chocolates or white chocolate in thin ribbons.
- Cookie Crunch – Roll apples in crushed cookies (like Oreos or graham crackers) immediately after dipping. The crumbs cling best while the caramel is tacky.
- Salted Toffee – Sprinkle toffee bits and flaky salt once the caramel is partially set. This keeps the salt from melting into the caramel but still allows the toppings to stick.
How to Package Caramel Apples for Selling
- Use clear apple boxes to protect each apple and show off the glossy caramel. They give a professional, gift-shop look that customers love.
- Add pre-tied bows for a polished, ready-to-gift finish. A bow instantly upgrades the presentation without adding extra work.
- Label each box with your bakery name, logo, or flavor for branding that helps you stand out at markets.
- Skip cellophane bags I started with them, but switching to boxes made my apples look higher-end and they sold faster at farmers markets and farmstands.
With the right packaging, your caramel apples aren’t just desserts, they’re ready-made fall gifts customers can grab and go.
Troubleshooting Made Simple
The first time I made caramel apples, the caramel slid right off. Another time, the batch hardened into something closer to a bath of hot candy. Here’s what I’ve learned: if it slides, the apple wasn’t dry enough; if it’s too hard, the caramel was cooked too hot; if it’s too soft, it wasn’t cooked long enough. Grainy texture comes from crystals on the pan sides. These little lessons came after reading detailed references in old cookbooks.
Common Questions Answered
What’s the difference between candy apples and caramel apples? Candy apples use a flavored boiled sugar recipe to create a distinctive red candy shell that cracks with the first crunchy bite.
Do I need Granny Smith apples? They’re my top pick, but other varieties of apples like Honeycrisp or Fuji also make delicious caramel apples.
Can I make them ahead of time? Yes. Caramel apples keep two days at room temperature, packaged in clear boxes.
How Long Do Caramel Apples Last?
- At room temperature: Caramel apples can sit out safely for about 1–2 days in a cool, dry spot. Any longer and the caramel may sweat or slide, and food safety becomes a concern.
- Refrigerated: For best freshness, keep them in the fridge. Properly stored, caramel apples will last up to 2 weeks, and sometimes even 3 weeks, depending on the apple and how well they’re wrapped.

Storage Tips for Caramel Apples
- Wax paper wrap – The best option if you’re storing apples. Wrap each apple individually so they don’t stick together. Wax paper won’t pull the caramel off like plastic wrap can.
- Glad Press’n Seal – Works well if you need a tighter seal. Wrap each apple individually and place them on a tray in the fridge.
- Cellophane bags – Good for short-term storage but they can also trap moisture and make caramel sweat.
- Clear apple boxes – Best for presentation and storage combined. They protect apples, keep them from sticking together, and show off the glossy caramel. Perfect for selling or gifting.
- Cool, dry spot – If you’re eating them within 24 hours, leave apples at room temperature in a cool spot. For longer storage, refrigerate in waxed paper or boxes for up to 2 weeks. Always let refrigerated apples sit out 10–15 minutes before serving so the caramel softens.
Classic Homemade Caramel Apples
Equipment
- Heavy-bottomed saucepan
- Candy thermometer (clips to the pot)
- Wooden spoon or sturdy spatula
- Parchment paper or silicone baking mat
- Wooden sticks (popsicle sticks or caramel sticks)
- baking sheet
Ingredients
- 8 small Granny Smith apples washed, de-waxed, dried, and at room temperature
- 2 cups packed brown sugar light for golden, dark for richer flavor
- 1 cup light corn syrup
- 1 can 14 oz sweetened condensed milk
- ½ cup unsalted butter
- ¼ teaspoon salt
Instructions
- Wash and dry the apples thoroughly. To remove wax, dip briefly in hot water with a splash of vinegar, then dry completely. Let them air-dry 15 minutes. Insert sticks into the top center of each apple. Line a baking sheet with parchment paper or a silicone mat.
- In a heavy-bottomed saucepan over medium-low heat, melt the butter. Stir in the brown sugar, corn syrup, sweetened condensed milk, and salt. Stir frequently with a sturdy spoon, scraping the bottom and sides.
- Clip a candy thermometer to the pot and cook the caramel, stirring constantly, until it reaches 230–240°F (soft-ball stage).
- Remove from heat and let the caramel cool until it reaches about 190°F. This is the best dipping temperature—hot enough to coat smoothly but cool enough to cling.
- Tilt the pot slightly and dip each apple, rotating to coat evenly. Let excess drip back into the pan, then scrape the bottom lightly on the pot edge. Place apples on the prepared baking sheet.
- While the caramel is tacky, roll apples in toppings like chopped nuts or cookie crumbs. For chocolate drizzle, wait 10–15 minutes before adding thin ribbons of melted chocolate.
- Allow apples to cool completely at room temperature until glossy and firm. Package in clear boxes or wrap individually in wax paper for gifting or selling. Refrigerate for longer storage, up to 2 weeks. Let sit at room temperature before serving.
Notes
More Apple Recipes:

Cynthia Stankalis says
The caramel is too runny. followed the recipe to a t. dont know what happened. tastes amazing. will let it set up and wrap the caramel around the apples. yes i did soak my apples to get the wax off.
Better Baker says
Hi Cynthia, thanks so much for trying the recipe! If your caramel turned out a bit runny, it’s usually because it didn’t quite reach the right temperature before dipping. Even a few degrees can make a big difference. Next time, try cooking it to 230–240°F (soft ball stage) and it should set up perfectly. I’m glad you loved the flavor!
Patty says
WOW! First time I've tried this from "scratch". I've done it in the past with caramels and it was "ok". Often the sauce dripped off but likely because I didn't rinse them in vinegar! I followed everything per the recipe and they turned out amazing and the sauce stuck perfectly. I had enough left (made 7 large apples) to have a good sized jar for dipping fruit etc. Never buying this stuff again - this is so much better! I did use dark brown sugar and ended up with a few dark flecks in the sauce as I think it may have initially burned a bit but this did not affect the taste at all! Next time I'll be a bit more careful.
Carol says
Made this yesterday and it turned out PERFECT! Thanks so much for the recipe.
Lane says
Should I let the caramel cool completely or just until the tacky stage if I want to dip them in a chocolate coating as well? Thanks in advance!
Better Baker says
I've never double dipped the caramel apples but I imagine its best to let the caramel firm up so that when you dip them in chocolate it sets up faster.